This document describes how to perform automatic motor parameter identification. It is generally done when connecting new wiring, changing motors, or replacing loads.
¶ 1. Preparation
-
Download LinearMotorHost PC software:
Download Link -
CH340 USB Driver:
Download Link -
Prepare a mini USB data cable

-
A Windows PC
¶ 1.1 Open the Control Box
Remove the screws shown in the figure below, and then remove the cover of the electric control box.

¶ 1.2 Install CH340 Driver
After downloading the CH340 driver, double-click to install it.

¶ 1.3 Connect the Linear Motor Driver to PC
First, power off the printer, then connect the mini USB to the mini USB port on the linear motor driver and connect the other end to your PC.


Once connected, manually move the toolhead to the center of the PEI plate as shown below:

¶ 2. Connect LinearMotorHost to Linear Motor Driver
Power on the printer.
Open LinearMotorHost, go to System Settings -> Connect Settings, select the corresponding driver model and communication method on the right side as shown below:

Double-click the port number to complete the connection.
Once connected, click the real-time icon. At this point, if you lightly move the corresponding motor by hand, you should see curve changes.

¶ 3. Perform Automatic Identification
Click Device Control, then enter the following interface:

Scroll down and find the Identification button, then click the Identification button.

The automatic identification process will start, where the linear motor will identify the load, electrical parameters, and other settings.
Refer to this video for the sound of the entire process: Video Link
After the one-click identification is complete, click Save Parameters. Then also click Save Parameters on the left side.

This completes the automatic identification.
¶ 4. Disable Automatic Filtering
After completing the automatic identification, a low-order filter is generally enabled. We recommend turning this off. Refer to the settings below:
First, go to Device Control -> Filter Settings, then click Disable on the right side to disable the motor so that you can operate the options on the left side.
Set all Command Current Filters in Specify Current Filter to No Filter.

Then select Low Frequency Vibration Filter and set all Low Frequency Vibration Filters to No Filter.

After configuring, click Save Setting and then Save Parameters on the left side.

¶ 5. Set Pulse Mode
After completing auto-calibration, you must configure the driver to Pulse Mode for Klipper to properly control the linear motor. Otherwise, your printer will remain unusable.
In this step, we need to configure the driver to receive pulses for movement control. Access the following interface and set the parameters as shown below:

Set the parameters as indicated in the figure:

After configuring, click Save Setting and then Save Parameters on the left side.

Note: After clicking Save Parameters, a dialog box will appear indicating "Parameters saved successfully!" Click OK to confirm successful saving.

¶ 6. Set automatic initialization at startup
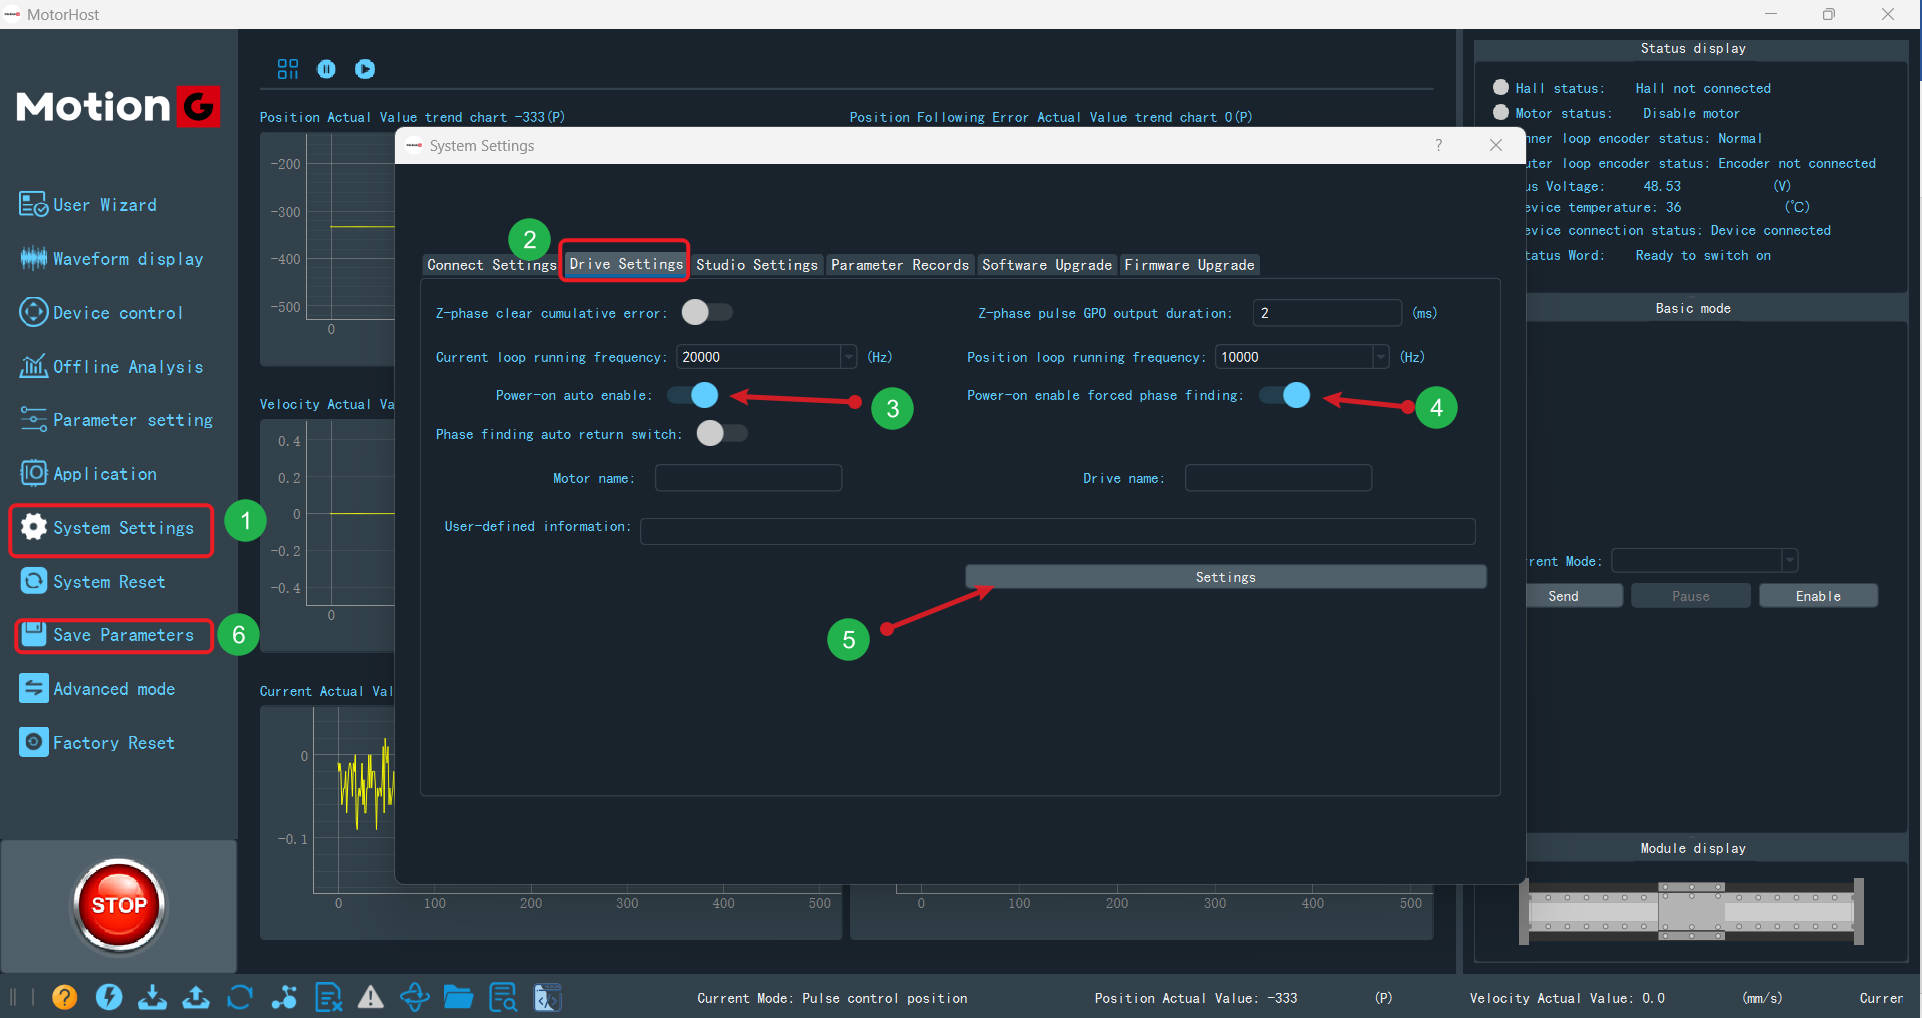
After completing a series of settings, refer to steps 1 to 6 in the figure below to set the motor to automatically initialize after power is turned on.

After configuring, click Save Setting and then Save Parameters on the left side.

¶ 7. Power Off and Restart the Printer
After completing the above settings, power off the printer and then restart it. Check if the corresponding axis moves correctly.