¶ 1. Preparation
-
Space and Stability:
Choose a spacious and accessible location for the Magneto X, considering its dimensions (55 x 61 x 70 cm) and weight (30kg). The chosen surface must be stable and level to prevent operational disruptions. Uneven surfaces can lead to misalignment and print failures. Ensure there's enough room for operation and regular maintenance. -
Weight Considerations:
Select a sturdy table or bench capable of supporting the printer's 30kg weight and the dynamic forces from high-speed prints. Reinforced workbenches designed for heavy machinery are recommended. Avoid unstable materials like glass. While placing the printer on the floor can offer stability, it may hinder accessibility and ease of use. Having a rubber causes problem.

-
Movement and Vibrations:
The MagXY motion system generates considerable force. Position the printer away from sensitive equipment and areas where vibrations could be disruptive. To mitigate vibration transfer, consider using anti-vibration pads under the printer's feet. -
Air Quality and Ventilation:
Choose a well-ventilated area to maintain air quality, as 3D printers can emit particles and fumes, particularly when using materials like ABS. A room with external ventilation or proximity to a window can help. In a home setting, avoid confined spaces like bedrooms. Consider an air filtration system designed for 3D printers for additional safety.

-
Temperature and Humidity:
Operate the printer in an environment with stable temperature and humidity. Extreme fluctuations can affect filament behavior and print quality, particularly temperature-sensitive materials like ABS/ASA/Nylon and moisture-sensitive filaments like those containing Nylon. Avoid placing the printer near sources of rapid temperature change like heating vents, air conditioners, or windows. -
Accessibility and Safety:
Ensure the printer is accessible for maintenance and filament changes, with ample room for safe maneuvering. Keep it out of reach of children and pets. Be aware of high temperatures, as the print bed reaches 100°C and the nozzle is over 200°C. Always allow parts to cool before handling them. -
Power Supply:
The Magneto X needs a stable power supply. Place it near an outlet that meets the 110V / 220V requirements. Avoid using under-rated extension cords to prevent power issues and potential hazards. -
Noise Considerations:
Although the Magneto X's linear motor operates quietly, printing can be loud, especially with fans running at high speeds for materials like PLA and PETG. Consider the potential noise impact in a home environment and plan the printer's location accordingly to minimize disturbance. -
Tools and Equipment:
While the Magneto X comes equipped with all the necessary tools for its operation, maintaining a supplementary toolbox can enhance your printing experience and ensure you're prepared for any situation. -
Helper
Magneto X at 30kg can be heavy, especially when removing it from the box. We highly recommend you have at least one more person comfortable lifting 25kg to assist you with the setup phase. -
Special Note for Pacemaker and Electronics
While Magneto X's linear motor has a short range of magnetic field of 5cm, the magnetic force is quite strong within that field. Do not place any electronics on top of the linear motors to avoid unintended damage, and ask anyone with a pacemaker to be at least a meter away from the printer for safety reasons.
¶ 2. Unboxing Magneto X
Unboxing Magneto X
Magento X is often shipped in a fitted pallet.
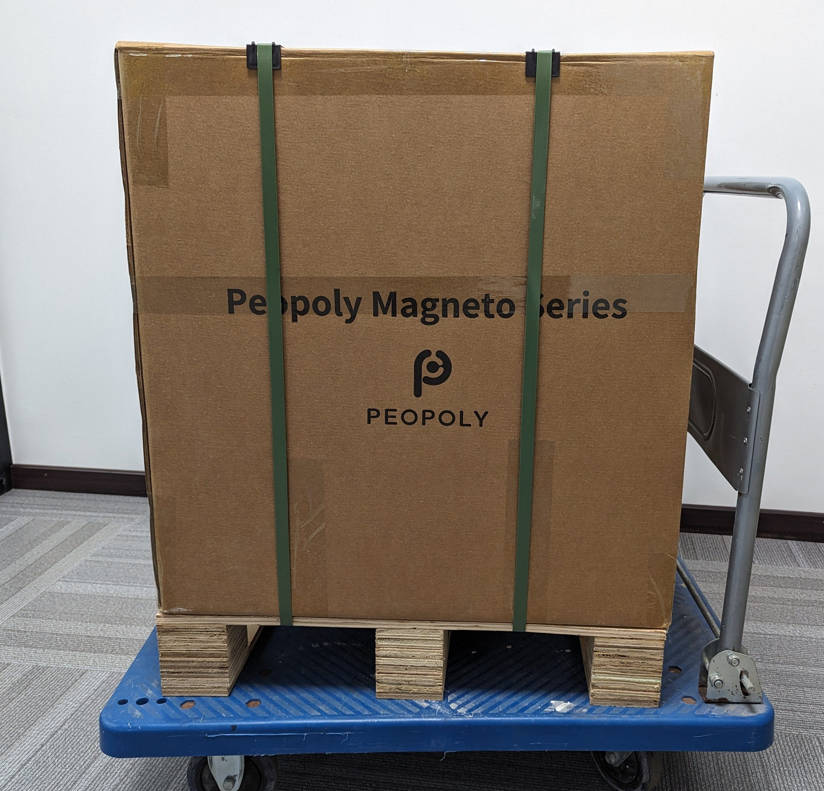
Properly unboxing your Magneto X is the first step to a successful printing experience. Here's a detailed guide to ensure you do it correctly, including checking for damages and connecting to power.
¶ 2.1 Inspect the Package
Before opening, inspect the external condition of the package. Look for any signs of damage such as dents, tears, or punctures that could indicate mishandling during shipment. If you notice significant damage, take photos for documentation and consider contacting the supplier before proceeding.
¶ 2.2 Prepare Unboxing Area
Choose a spacious and clean area to unbox. Ensure the space is stable and capable of handling the printer's weight as you lift it out. Having a second person can be beneficial due to the printer's size and weight.

¶ 2.3 Unboxing
Cut the Tape Carefully: Use a box cutter or scissors to gently cut the tape. Avoid using excessive force that could damage the printer inside.

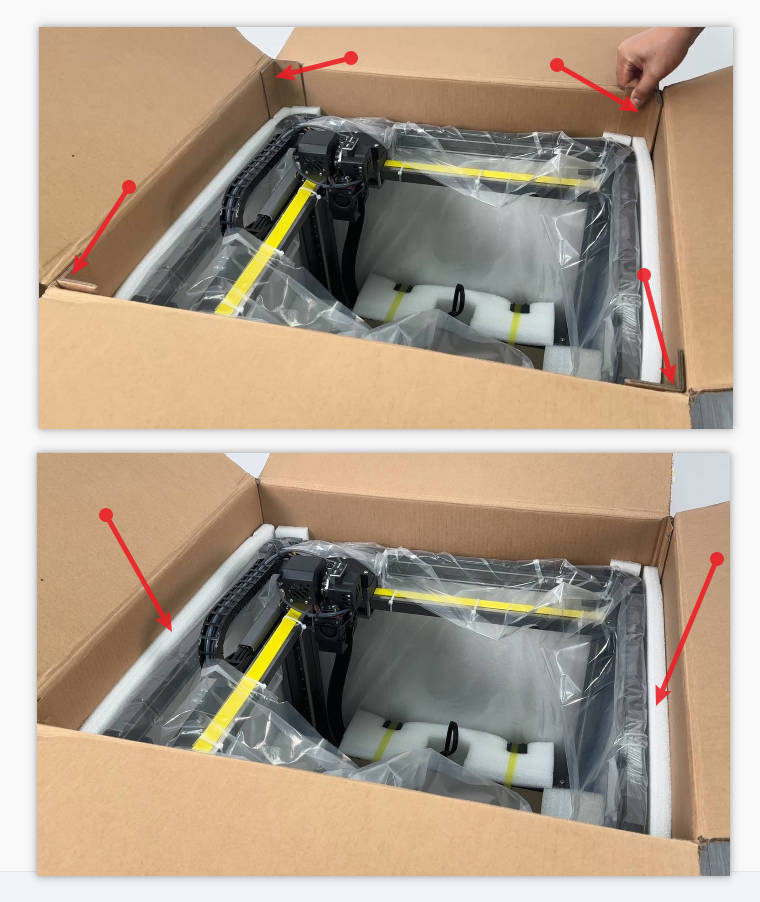
Remove the Top Layer: Take out any top-layer packing materials and set them aside. These might include foam, cardboard, or protective plastic.

Then take out the side protections.
First take out the foam on all 4 sides of printers.
And then take out the 4 corner protection.
¶ 2.4 Check for Visible Damages
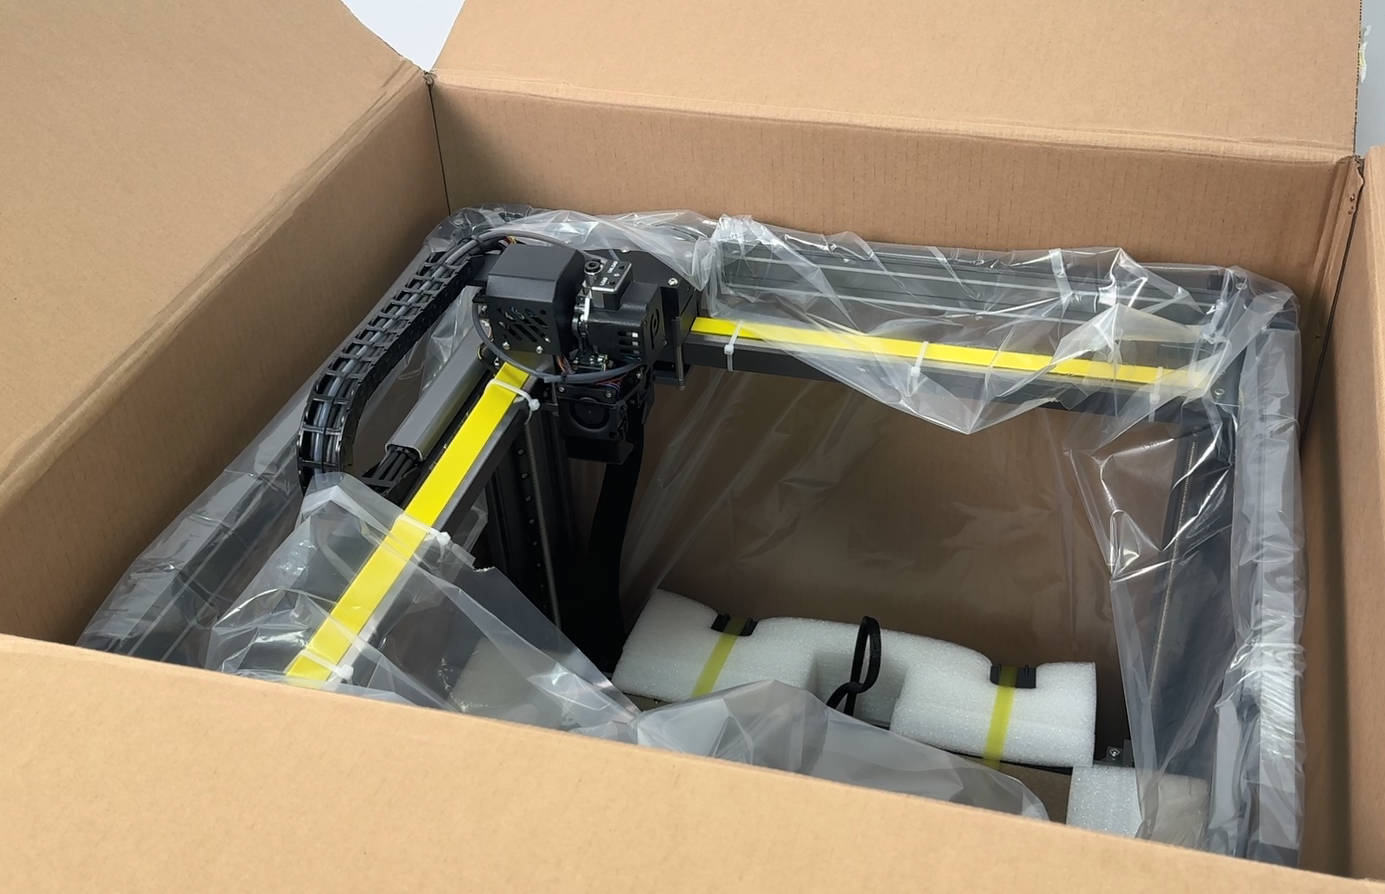
Before removing the printer, visually inspect it for any damages. Look for cracks, broken parts, or anything that seems out of place. If you find damage, it's important to document them with photos and contact the supplier for guidance.
¶ 2.5 Lifting the Printer
Carefully lift the printer out of the box. It's improtant to have two people for this step, one on each side, to safely handle the 30kg weight. When lifting, it is important for lifters to be on the longer sides (Y-Axis) of Magneto X (the sides without logo). Please see following picture for reference.
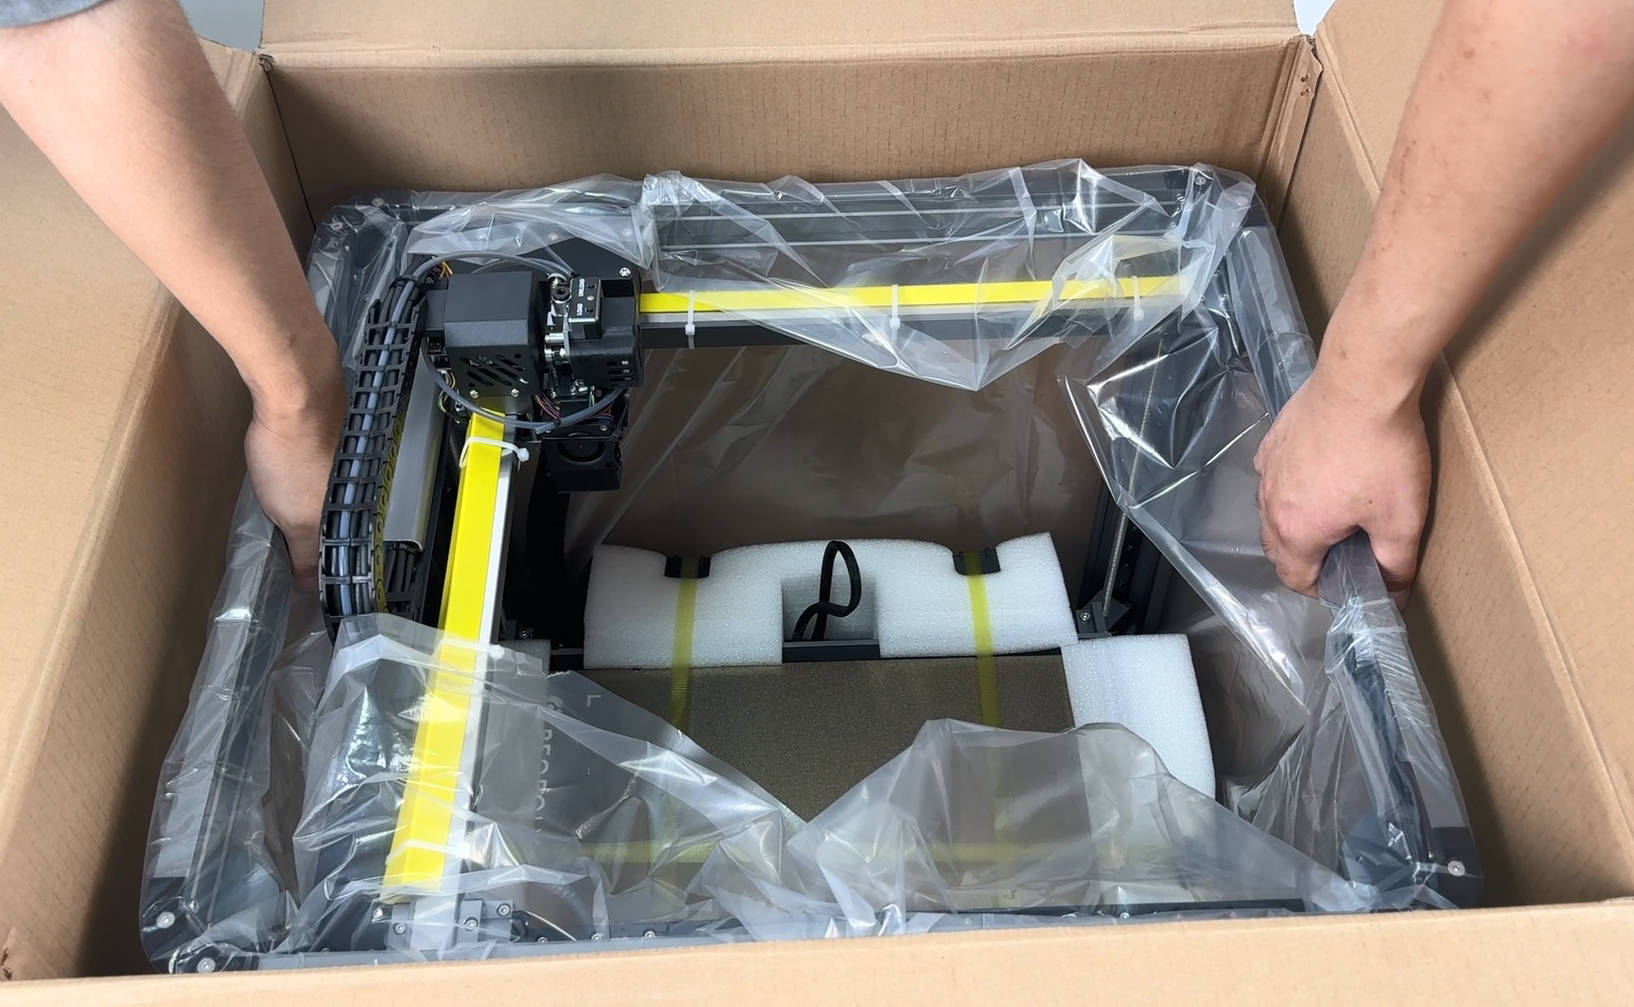
Place it gently on the floor for now for next steps.
¶ 2.6 Inspect the Printer
Once the printer is free from its packaging, conduct a thorough inspection for any hidden damages or loose components that may have occurred during shipping.
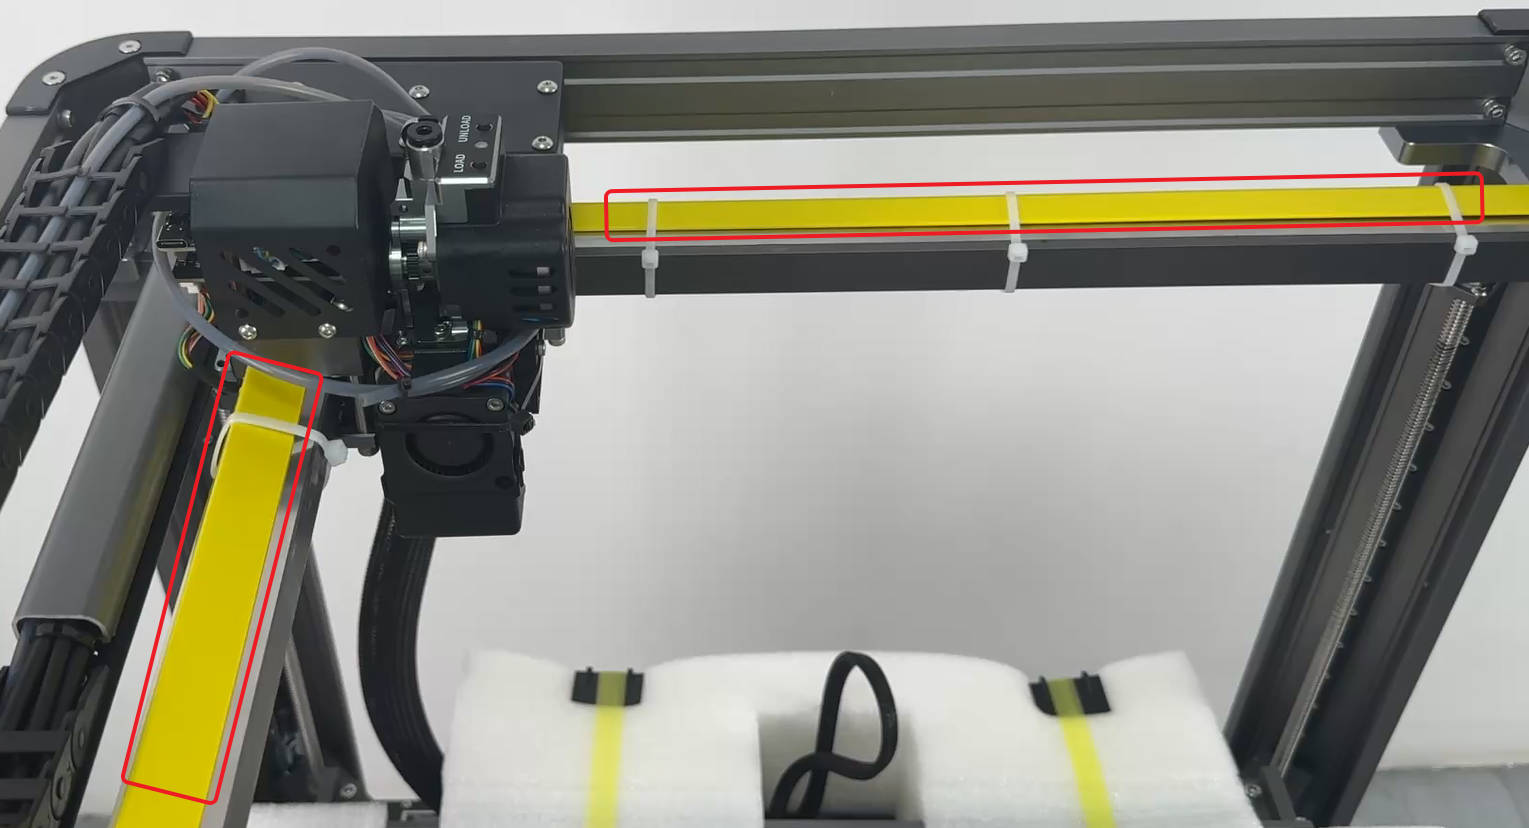
Check to see if linear motor proection is still on.
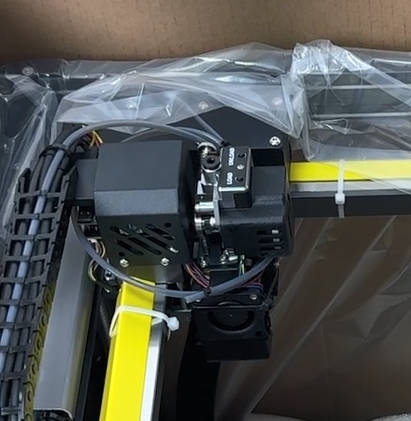
Check to see if the top extruder exterior is without damage
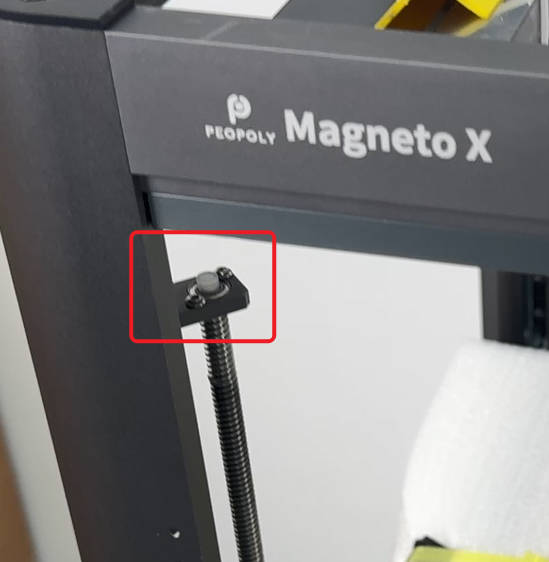
Check to the Z-axis for potential damages like deformation
¶ 2.7 Find and Check the accessories
In this step, we will remove the accessory package from the bottom of the printer.
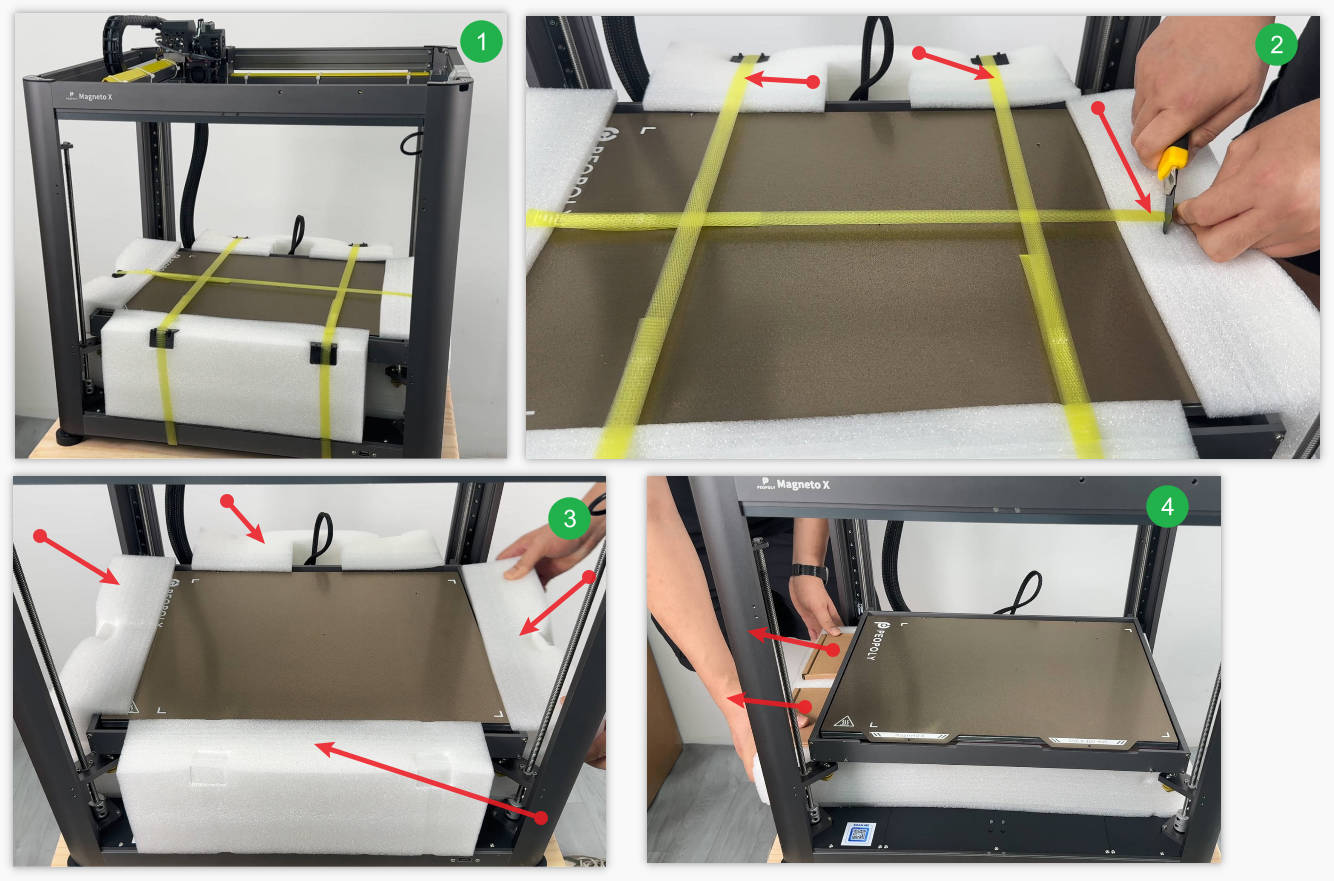
After taking out the pearl cotton from the side, you can see that there are 3 paper boxes embedded in the pearl cotton.
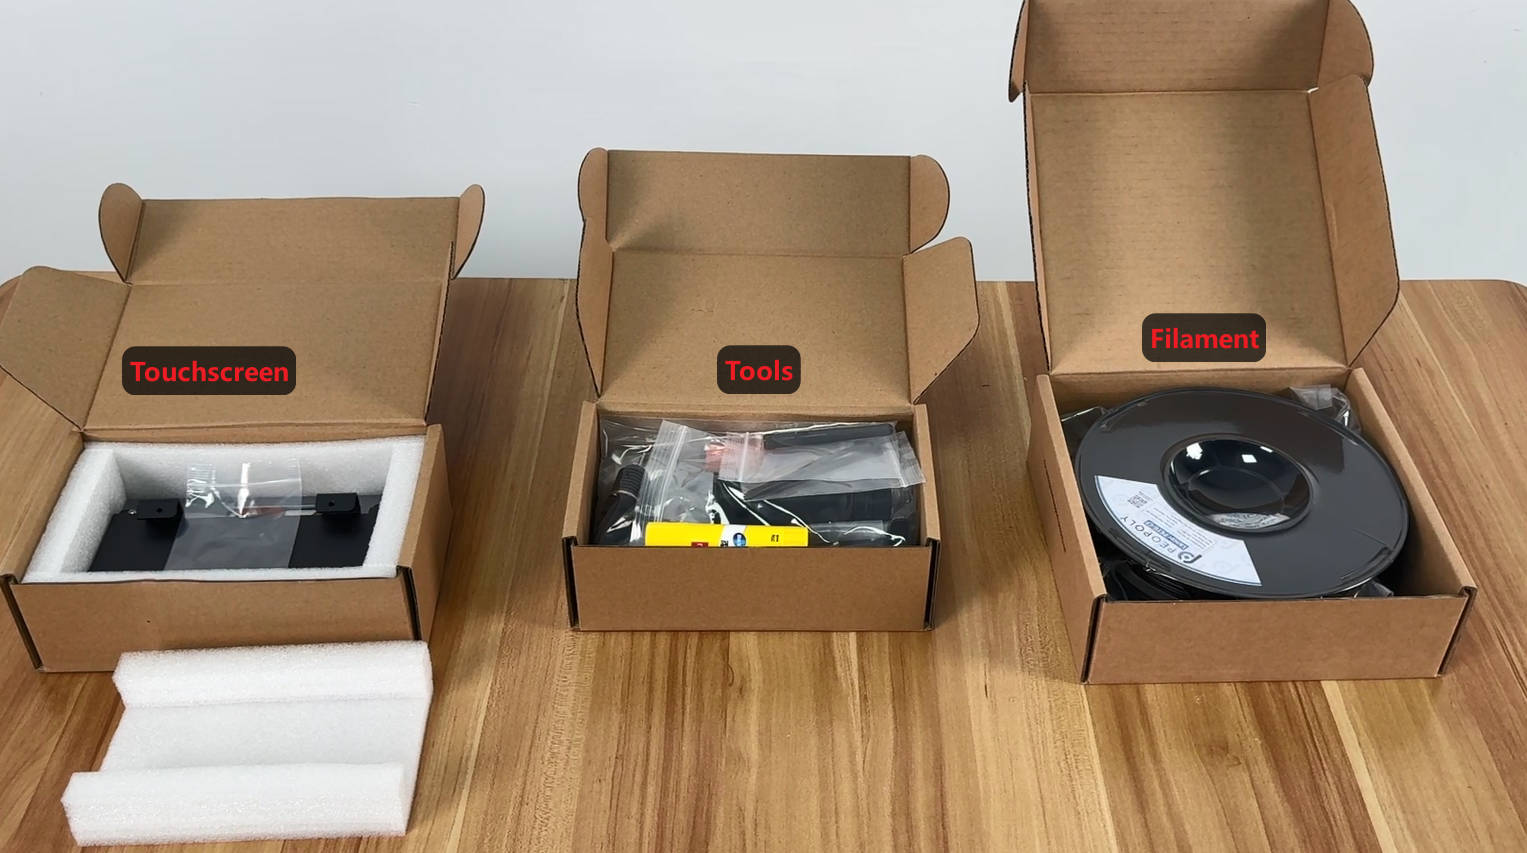
The tool box include:
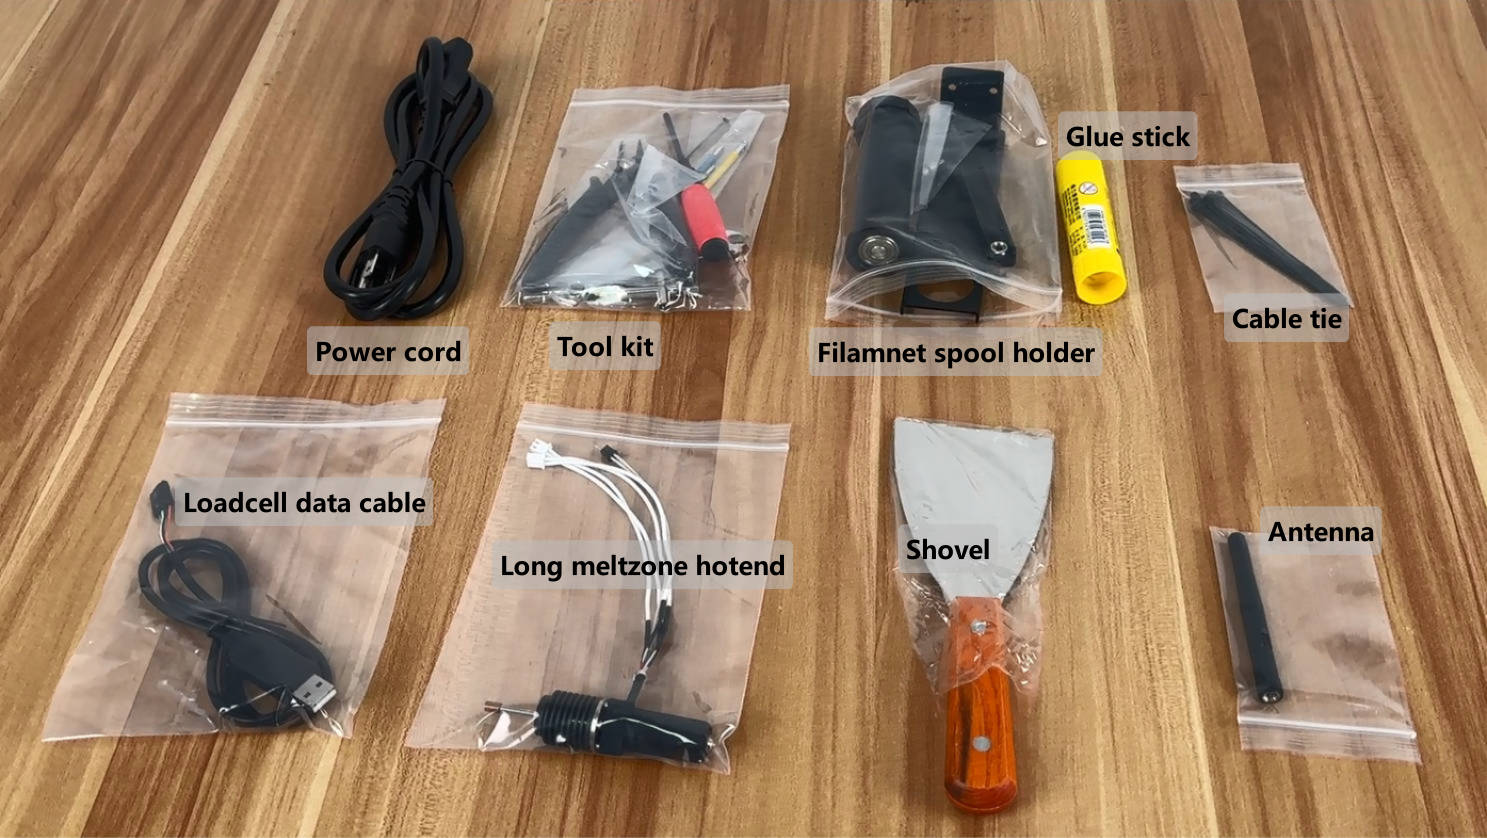
¶ 2.8 Inspect the Printer
Once the printer is free from its packaging, conduct a thorough inspection for any hidden damages or loose components that may have occurred during shipping.
¶ 2.9 Setup linear motor
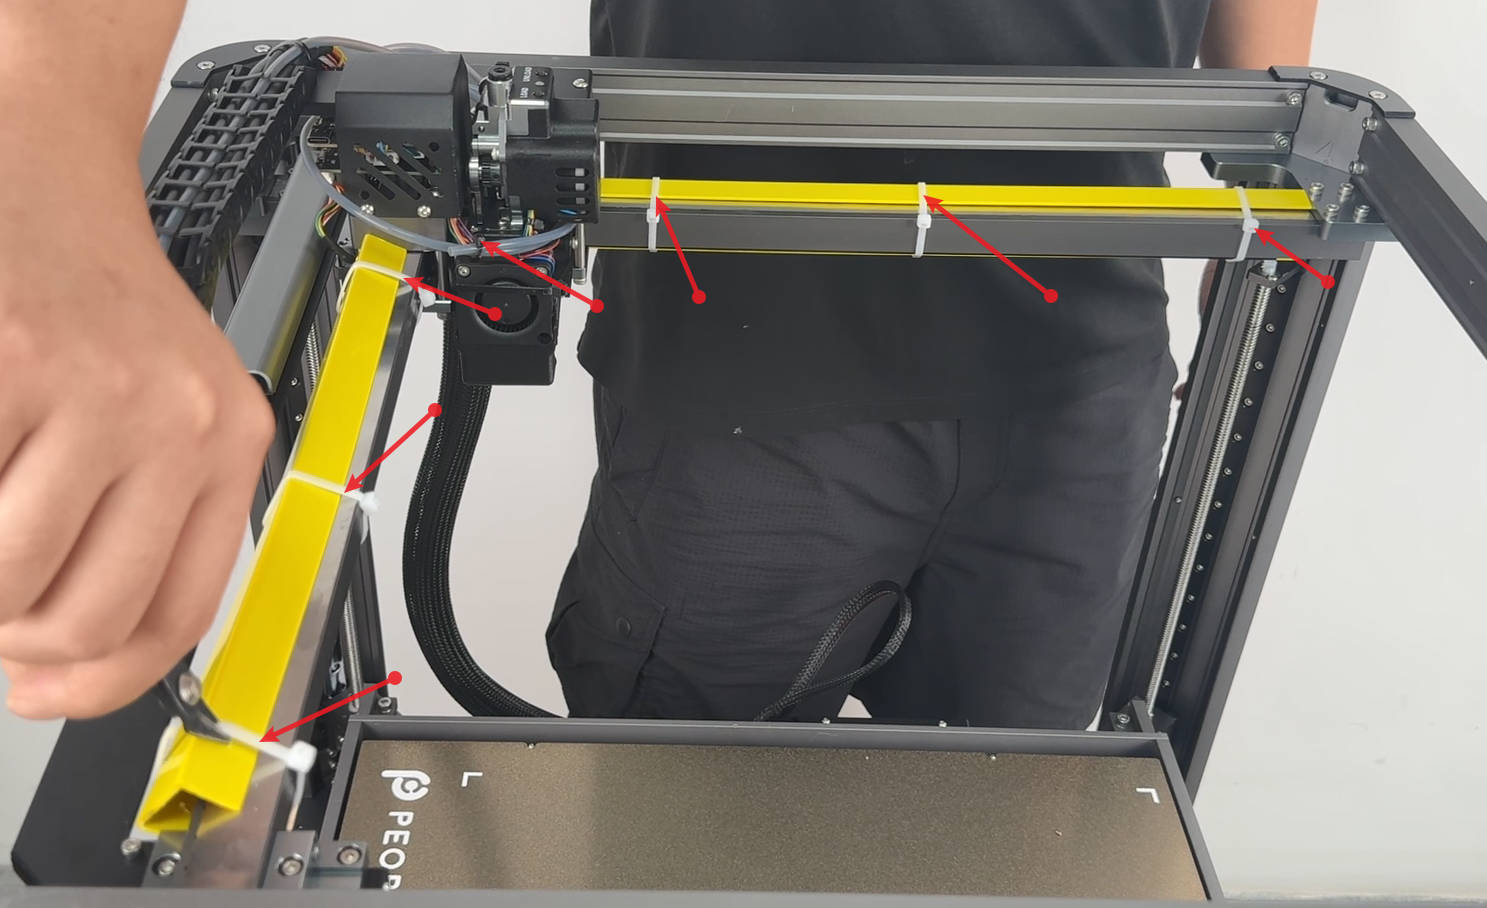
Cut off all the cable ties on the X/Y axis.
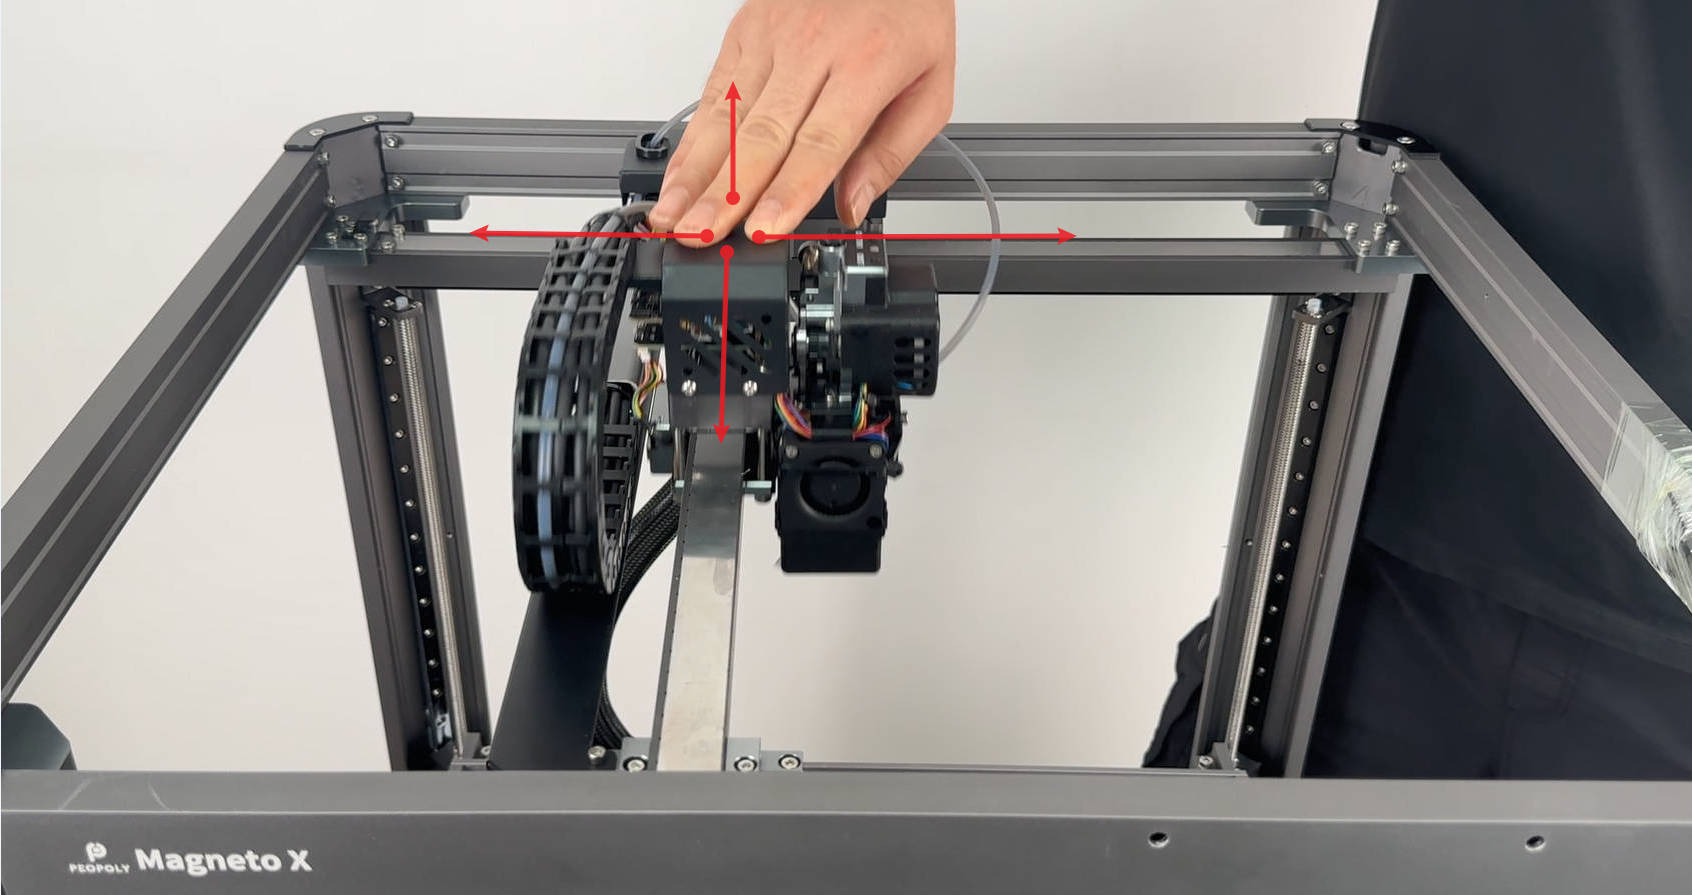
Move the toolhead back and forth by hand to check if the X/Y motors are moving smoothly
¶ 2.10 Install the Screen
Locate the touch screen found in previous step.
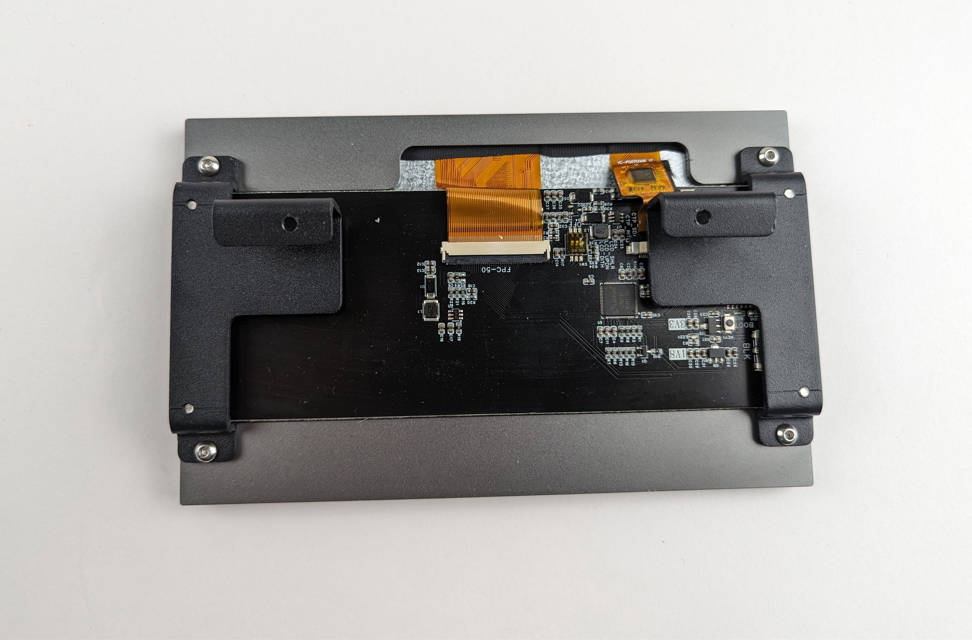
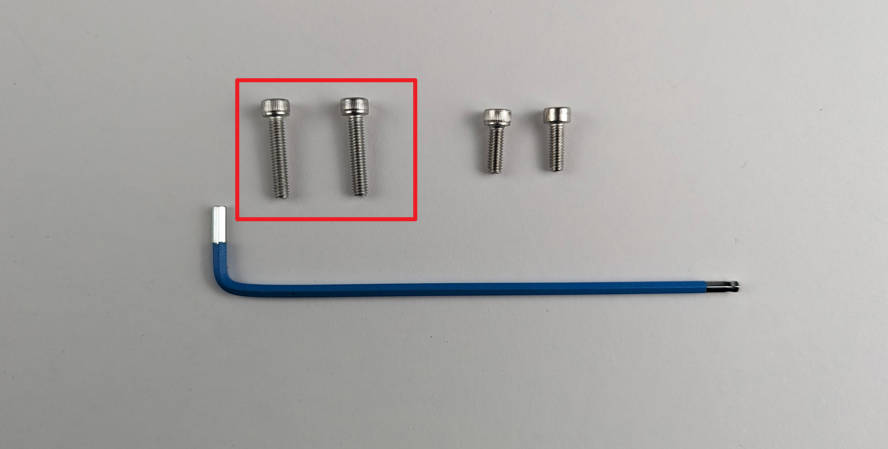
Locate the screws for the touch panel, it is the 2 longer screws of the 4 screws from the accessory box.
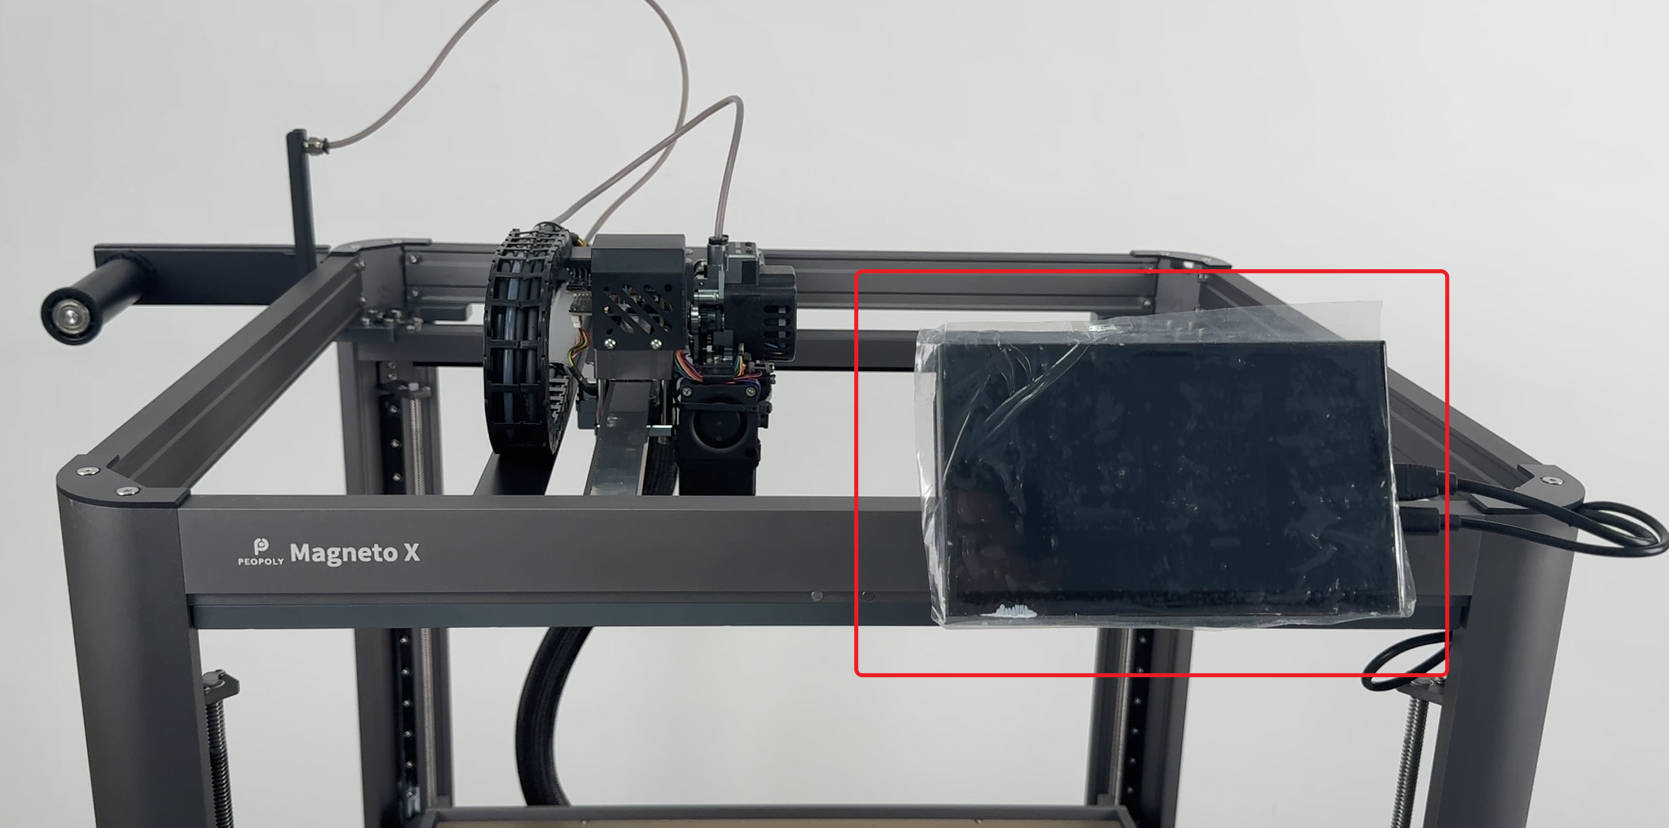
Locate the corner where web camera is installed. It is on the right hand side if you look at Magneto X from the front where you can see the logo.Tight each screw to secure the touch panel.

¶ 2.11 Install the Filament Rack and Teflon Tube
Locate the filament racks, blue wrench and the two left over shorter screws from accessory box:
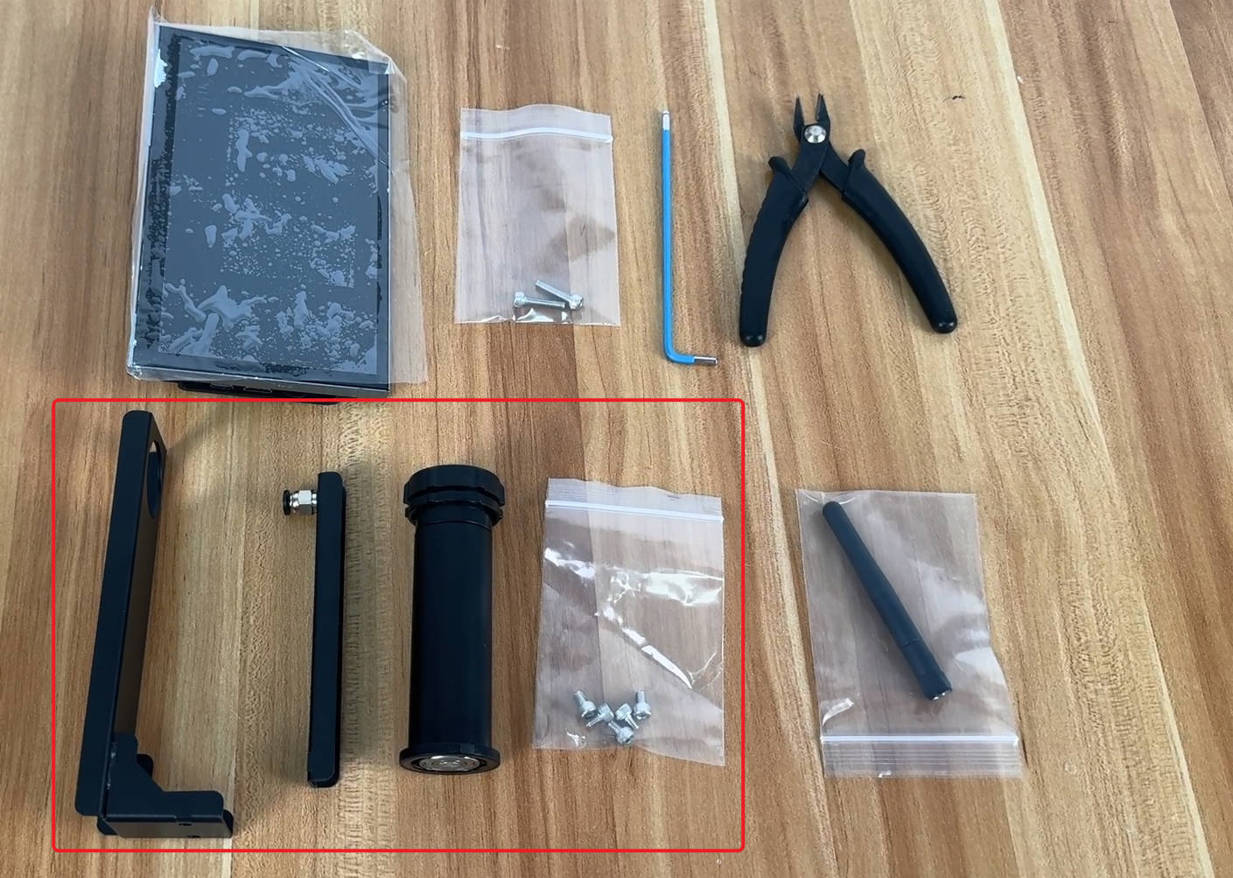
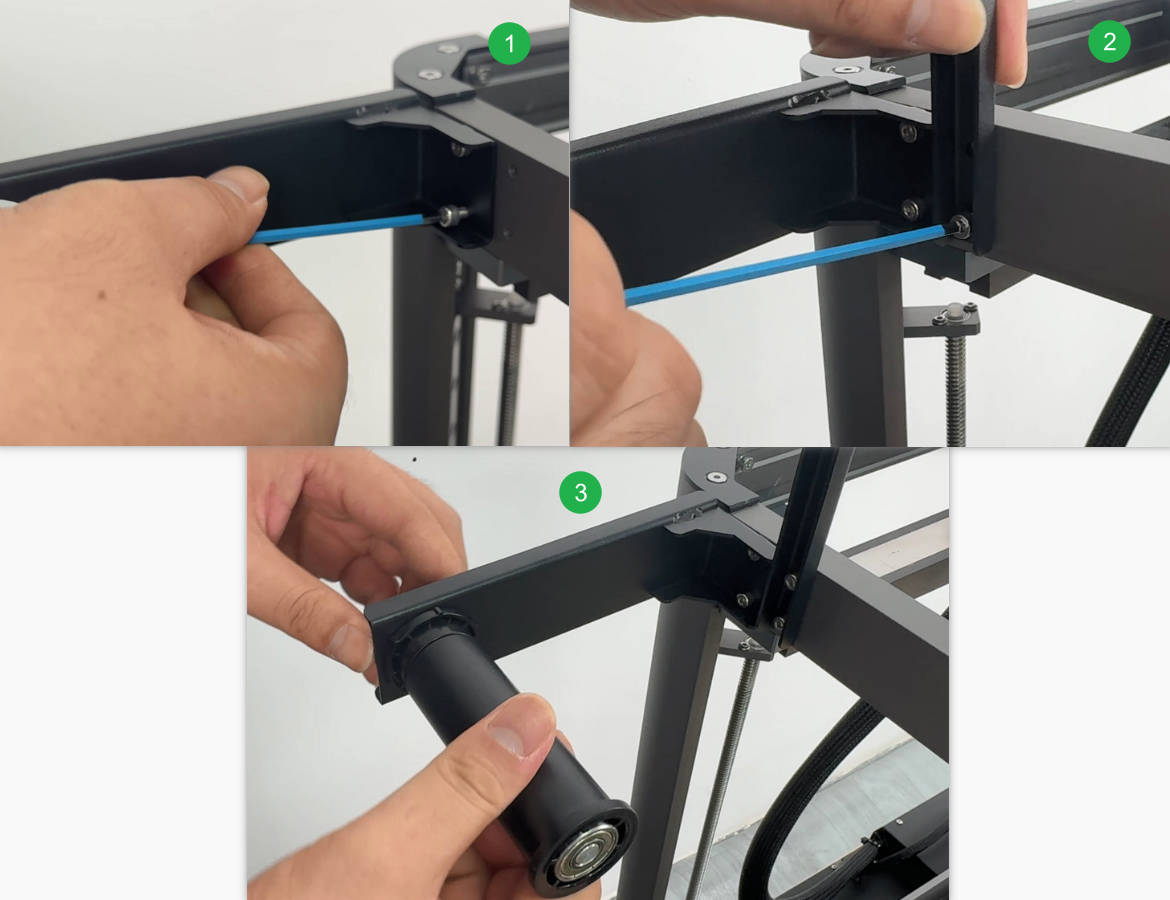
Follow the steps below to fix the filament spool holder to the left side of the machine:
After the installation is completed, fix the two ends of the Teflon tube respectively.
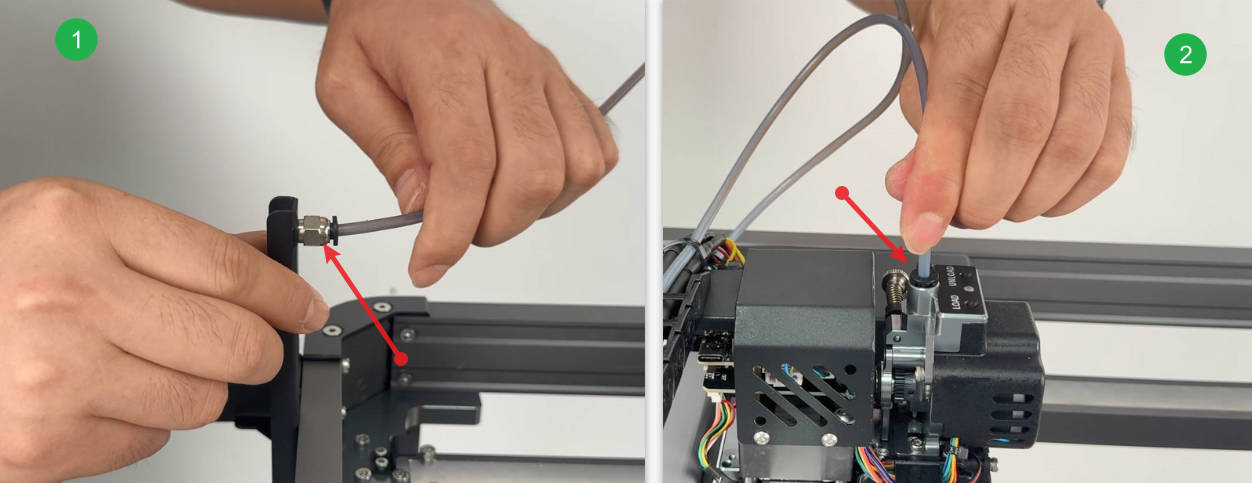
After fixing the Teflon tube, you need to push the toolhead manually to check the length of the Teflon tube, whether the layout is appropriate, and whether there is any interference with movement.
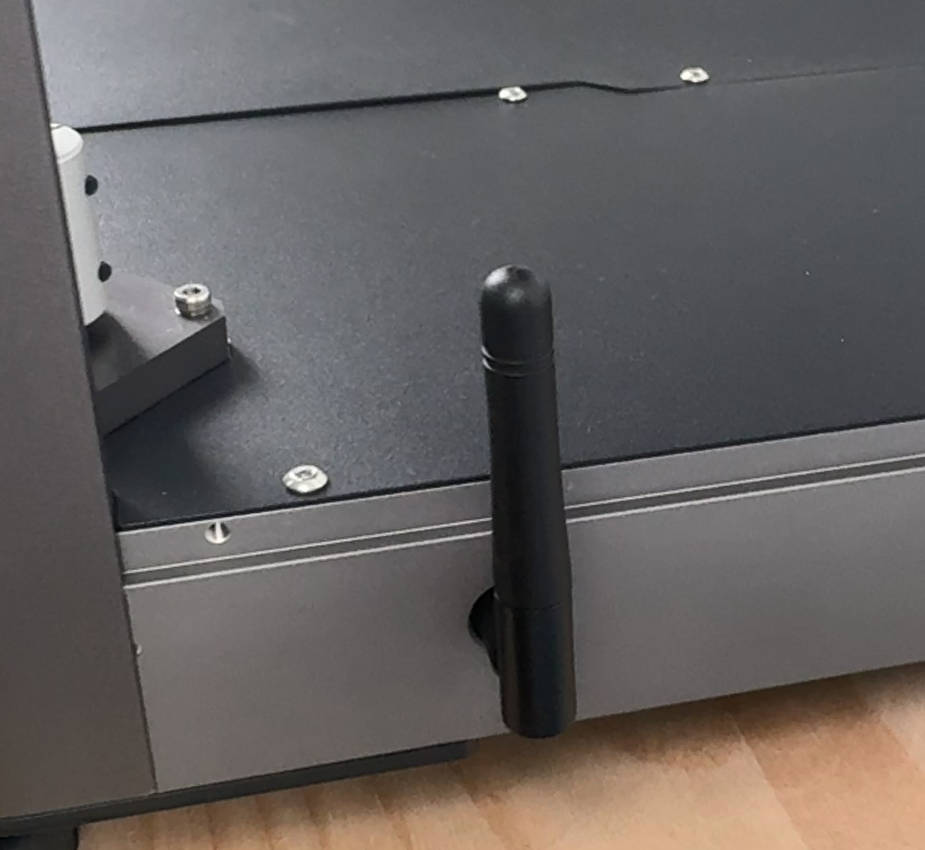
¶ 2.12 Install WiFi Antenna
Locate WiFi Antenna:
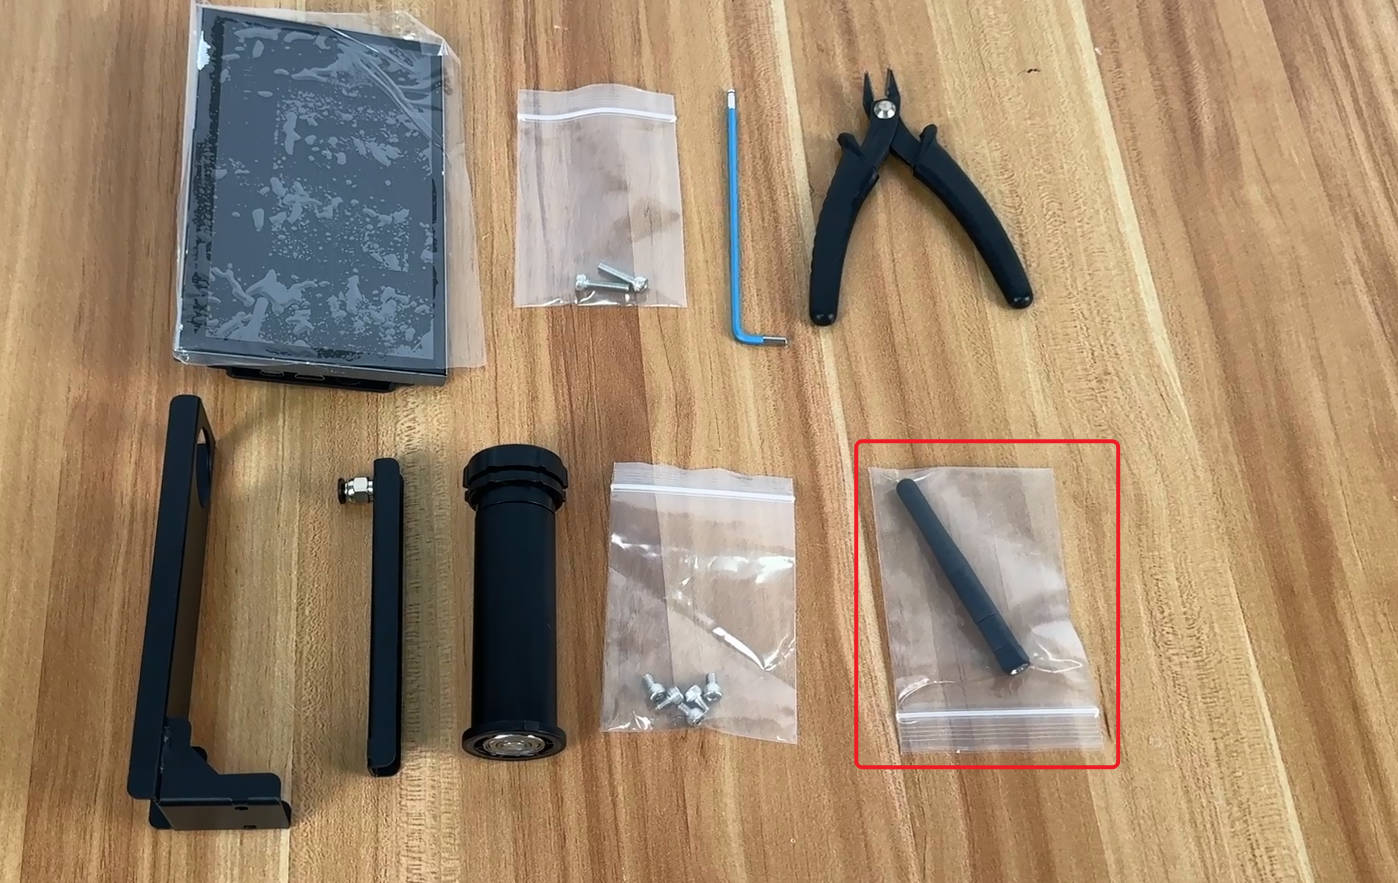
After finding the antenna, fix it to the antenna hole on the right side of the machine.
¶ 2.13 Final Inspection
Give the printer one last inspection to ensure everything looks correct and all parts are secure. Double-check that all tools and accessories are accounted for and that the workspace is clean and free of any packaging
¶ 3. Powering Up
¶ 3.1 Initial Check
Before connecting the power, double-check that all cables and components are properly installed and secured. This includes the HDMI cable, power cord, and any connections to the extruder and motion system.
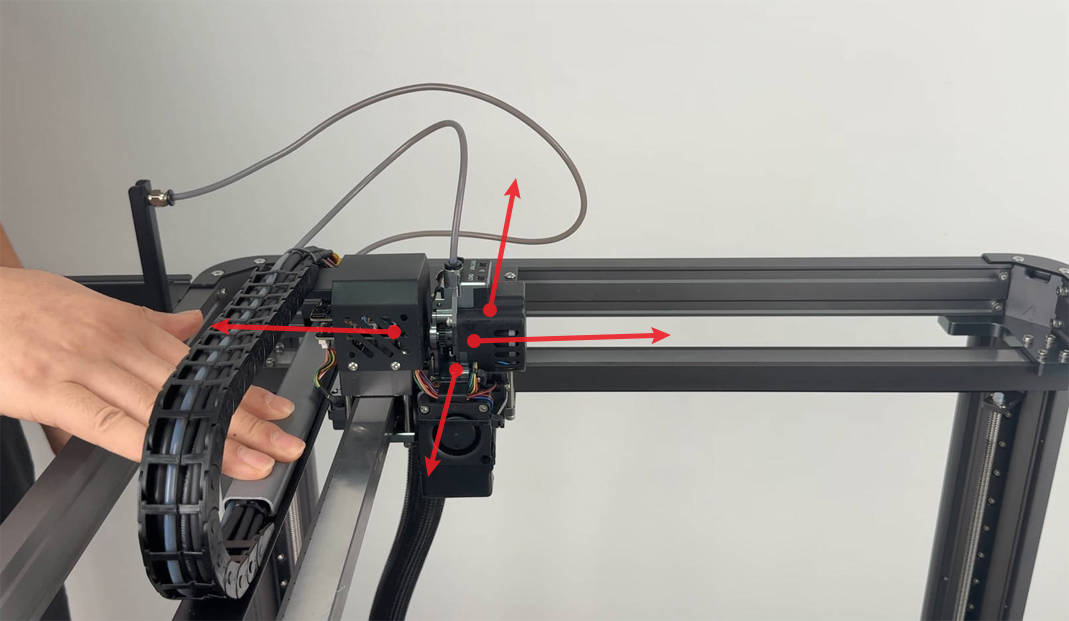
Now, we need to check linear motor movement and set it up for powering up.
Move the toolhead like below on both the x-axis and y-axis directions. You should be able to move it easily:

¶ 3.2 Connect to Power
Power Outlet: Choose a power outlet close to the printer's location to avoid needing extension cords. If an extension is necessary, ensure it can handle the printer's power requirements.
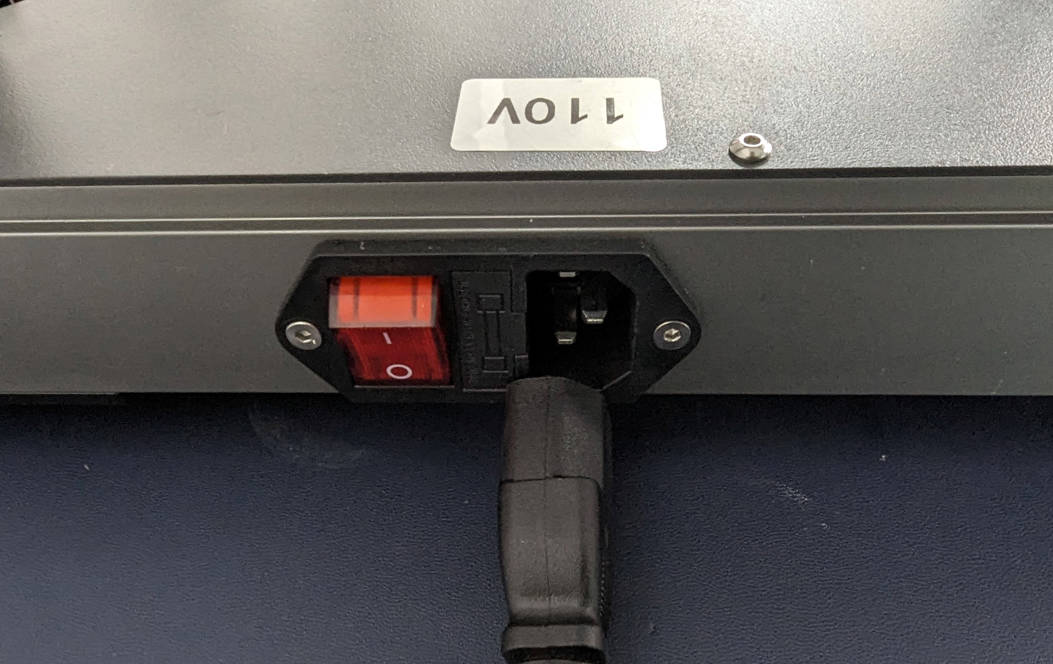
Make sure the power volt for your Magneto X matches matches local voltage:

If not, hold and immediately contact support at support@peopoly.net
Do not attempt to power on!
Connecting the Power Cord: Plug one end of the power cord into the printer and the other into your power source. Wait to turn on the printer.
¶ 3.3 Power On the Printer
Locate the power switch and turn on the printer. Observe the initial reactions of the system.

¶ 3.4 Monitor HDMI Output
Characters Display: Watch the screen connected via HDMI. It should display characters or a startup sequence normally. An image here showing a normal startup screen can reassure users.

After the system started, the screen show below:

¶ 3.5 Extruder Light Check
Extruder LED: Observe the lights at the extruder.
The one on the left is the power LED and should be red, while the LED on the right is the loadcell sensor is green.
Both lights should be steady and have no flickering:

If either LED flickers, this might indicate an anomaly. A close-up image of the extruder light in a normal state could be helpful here.

¶ 3.6 Manual X and Y Axis Check
Movement Test: About 30 seconds after the screen is powered on, you reach this screen:
Then, you gently push the toolhead along the X and Y axes with your hand.
The toolhead should resist movement slightly and not move freely; this indicates the motors are engaged and functioning normally.

¶ 3.7 Indicator Lights Check
-
Normal state LED color: green
-
Abnormal status LED color: red
-
Left LED: X motor status
-
Right LED: Y motor status
-
Left button: Disable X Y linear motor(long press 3 sconds)
-
Right button: Enable, clear XY motor errors(long press 3 sconds)
If an abnormality occurs in the motor and the motor status light turns red, please press and hold the motor enable button to reinitialize the motor.

¶ 3.8 Listen to Unusual Noises
Listen Carefully: As the printer powers up, listen to any unusual sounds. Noises that don't match the expected operational hums and fans could indicate an issue.
¶ 3.9 Observe Error Messages
Screen Alerts: Keep an eye on the display for any error messages or warnings. Familiarize yourself with common alerts so you can respond appropriately.
¶ 3.10 Document Any Anomalies
Note Irregularities: If you notice anything unusual during these checks, document it with notes and photographs. This information will be crucial for troubleshooting customer support.
¶ 4. Touch Screen Interface
At the core of Magneto X is Klipper, a high-performance firmware running on Linux that orchestrates every detail of the 3D printing process. Here we will go over the graphic control interface on the touch panel so you can have a basic understanding of what menu items are for so you can proceed to calibrate and print
¶ 4.1 Main Interface
This is what you will see when printer finishes bootup:

¶ 4.2 Left Side for quick control
On the left side, you can see control strip with 4 buttons.
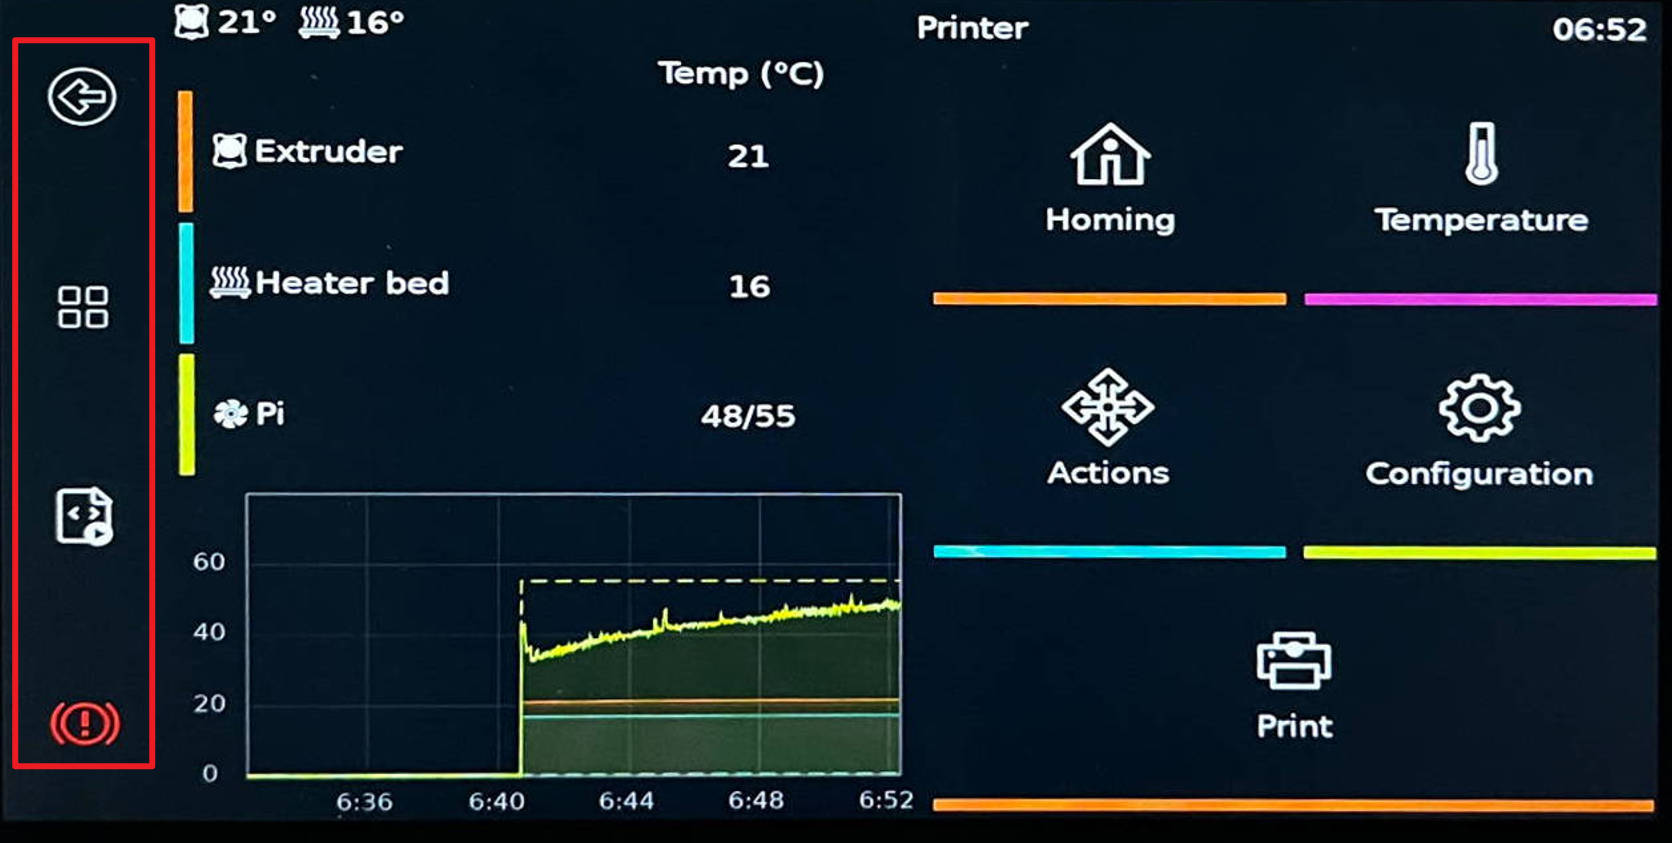
This button allows to you to go back to previous menu or step:

This button takes back to the Main Interface. It is helpful when you are lost.

This is the marco quick access button:

This is the emergency stop button. It is useful when something is going wrong and you need to halt the printer immediately.

You can access those buttons simply by touching them.
¶ 4.3 The temperature display:
All readings are in Celsius
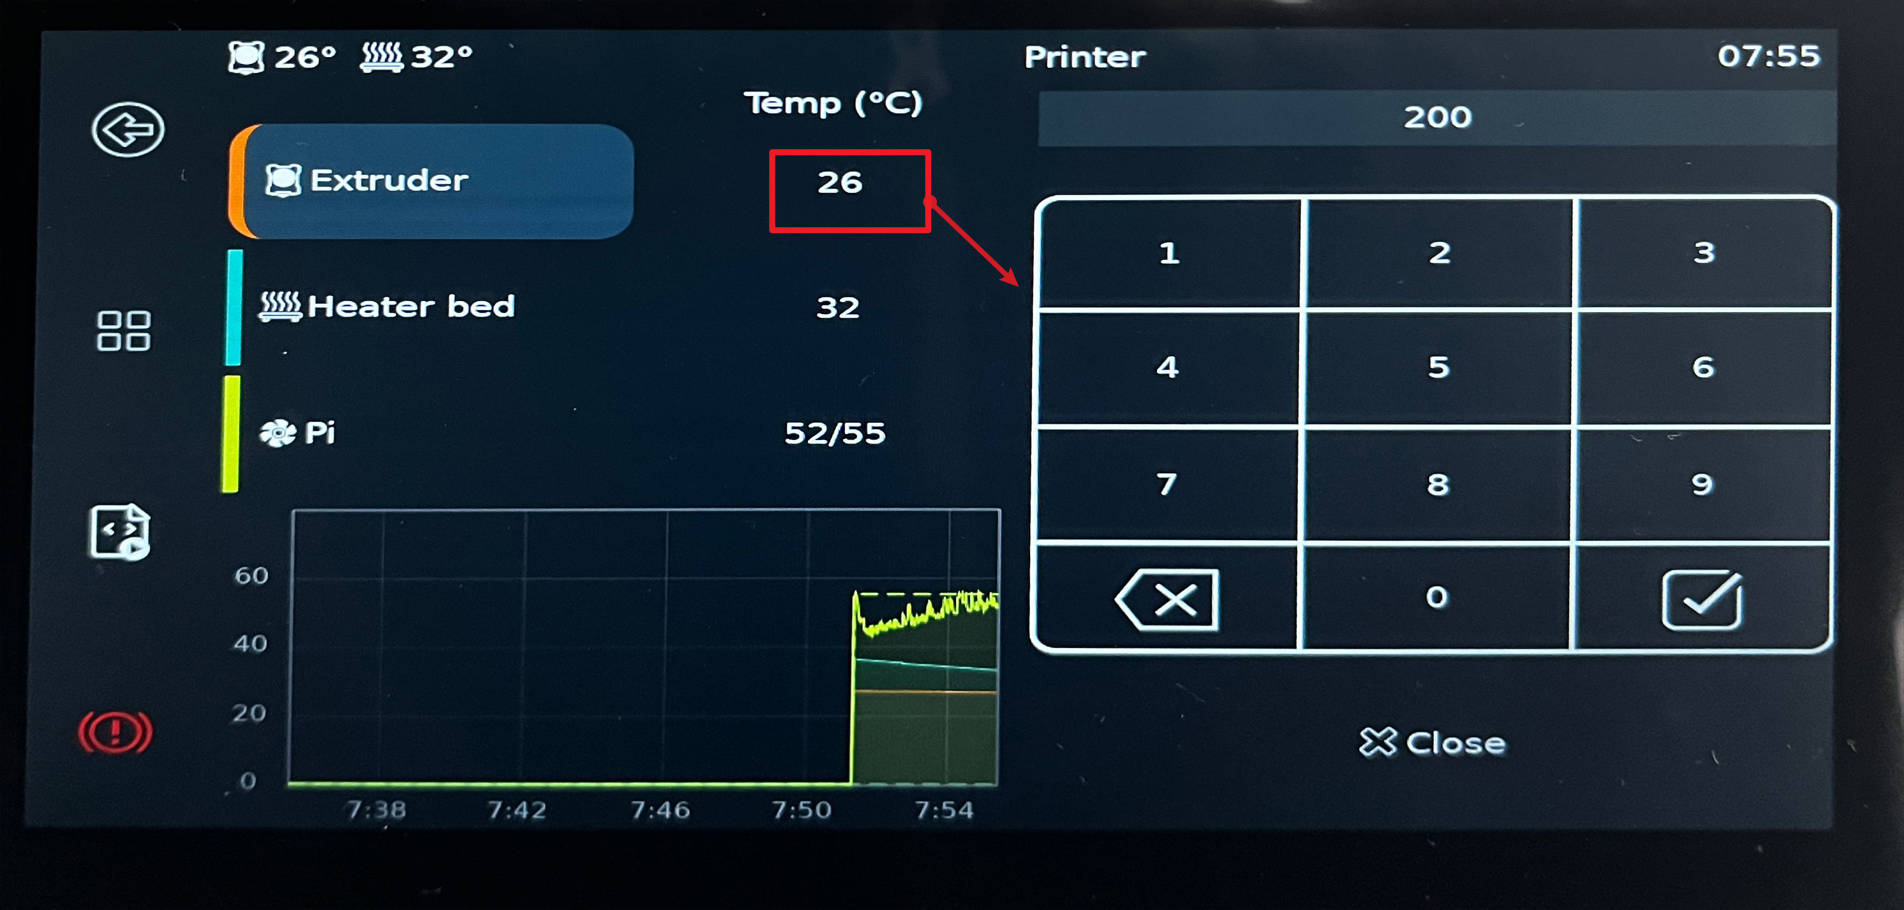
In the center left of the main interface, it is several temperature indicators. Temperature is one of the most critical aspect for any 3D printers and here you get full readings.
At the top, you can see the two small icons, on the left is the extruder temperature and on the right is the build platform temperature. The extruder temperature is the temperature measured at the meltzone.
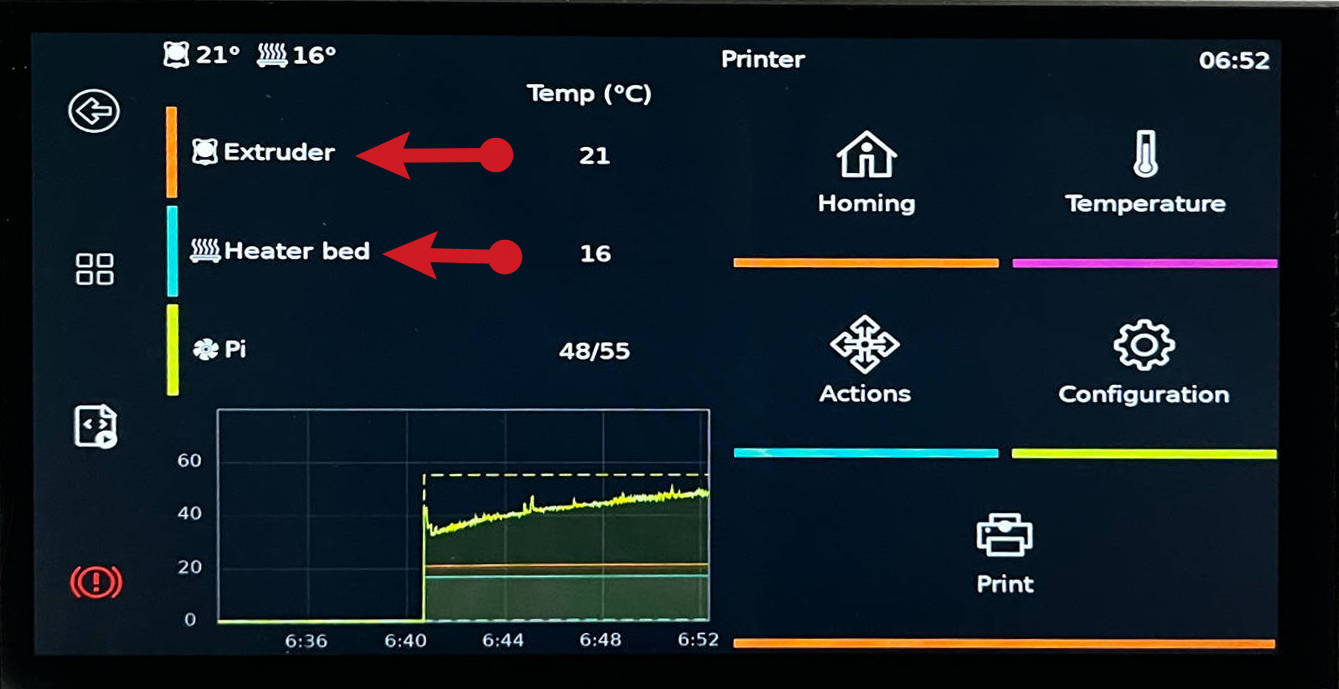
At the middle, you see three rows, they are Extruder, Heated Bed and Controller with their temperatures reading:
You can press on the reading for Extruder and Heated Bed to set target temperature.
¶ 4.4 Klipperscreen Menu
Right Side Menu:
You can see 5 larger incons on the right.
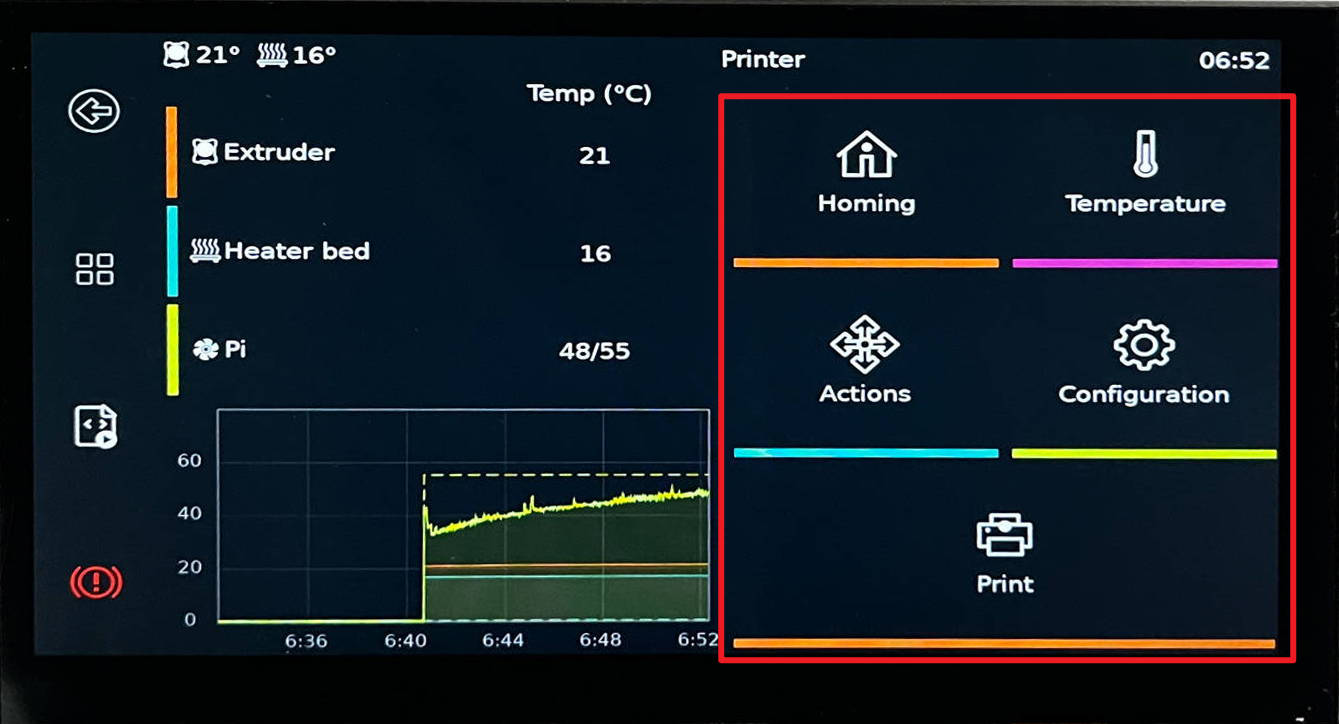
The Homing button takes you to various of homing options

The Temperture button would give you a sub menu of changing and reviewing temperatures
The Actions button leads to sub-menu of movements and leveling commands

The Configuration button takes you some functions that adjust settings, including network and bed mesh.

And Print button takes to you the print sub menu for starting a print

These menus are your key control for managing your Magneto X. You will use some of them in the next step.
¶ 5. Calibration(Quad Granty Level and Bed Meshing)
Leveling is one of the most important calibration step for 3D printers and here we will perform the Quad Granty Level and then Bed Meshing to prepare Magneto X for printing.
¶ 5.1 Preparation
- Double check make sure there is no debris of extruded plastic off the nozzle
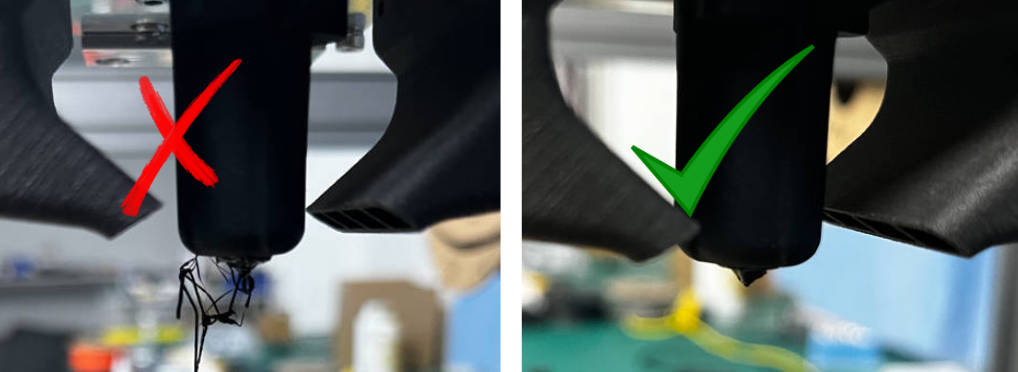
- Make sure the platform is clean and there is nothing on the platform which would affect leveling

¶ 5.2 First Z-axis homing
The endstop of Magneto X is realized by loadcell. When the nozzle touches a certain pressure, it will trigger the endstop signal of z axis.
For safety reasons, we need manually trigger the z endstop when you perform the homing operation for the first time after turning on the machine, which can avoid damage to the bed and nozzle if there is an abnormality in the z limit signal.
First click Homing, then click Home All

When the bed plate starts to rise, put a shovel under the nozzle and push the nozzle slightly, the hot bed will stop rising. Then immediately push the nozzle with the shovel again, and the hot bed will stop moving.
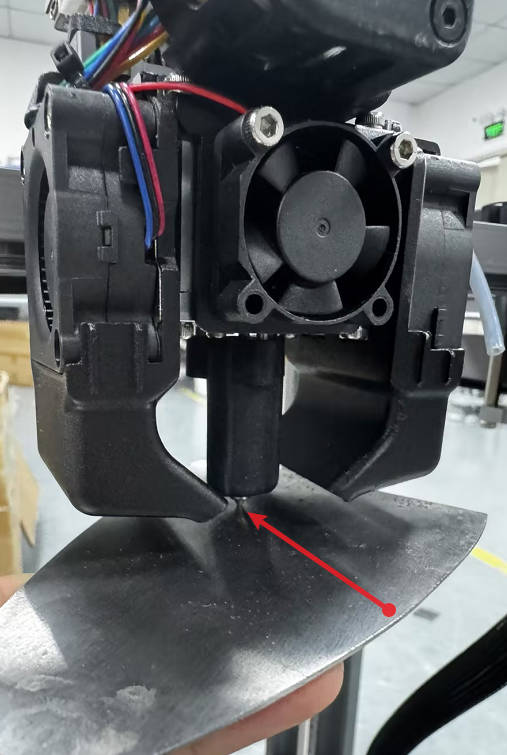
This completes a manual trigger z-axis limit test. If it is normal, we will proceed with other tests.
If there is a problem with the manual test z-axis reset, please contact support@peopoly.net
¶ 5.2 Quad Gantry Level
Quad Gantry Level uses loadcell sensor to check and adjust 4 corners of the platform to get optimal leveling. It will move from corner to corner until it is able to get the leveling to a satisifactoy close range.
To start Quad Gantry Level
First go to Homing in the Main Interface
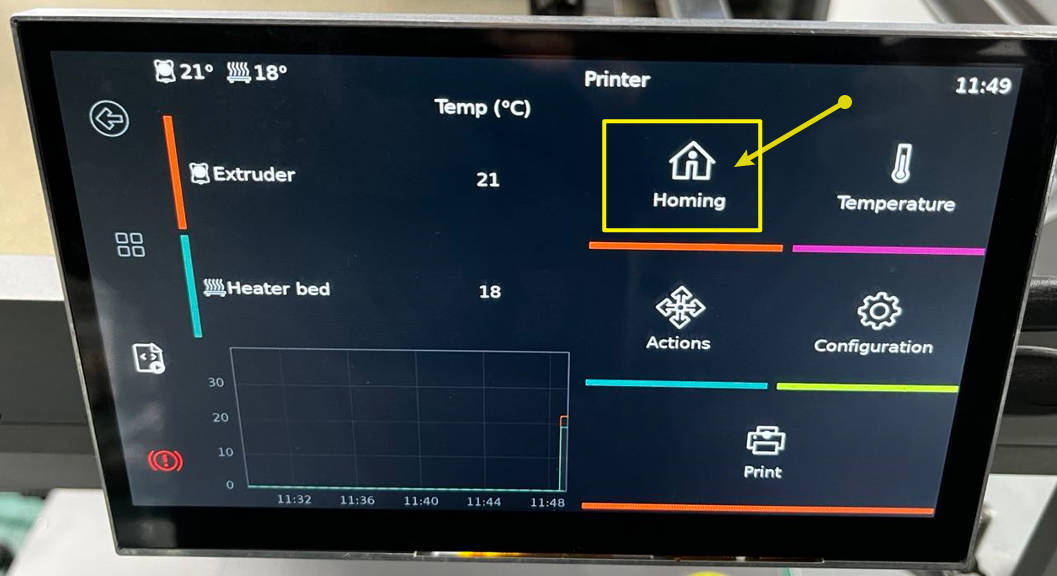
Click "Quad Gantry Level" button:

Once the leveling starts, the build plaform will first heated to 70C degree before the toolhead starts to move to corners and check leveling. During heating, you will see following message on top of the screen:

If you start Quad Gantry Level process and after awhile, you see the "Too Many Tries" mess pops up at the end of process, it means that Quad Gantry Level failed to get the bed level within satisifactory tolerance. Please restart the Quad Gantry Level again and it will pick up from where it left off and try to complete. If you continue to get "Too Many Tries" after 2 attempts, please reach out to support.
Only proceed to next step when Quad Gantry Level completes without "Too Many Tries" message.
¶ 5.3 Bed Mesh Calibration
Bed Mesh process helps to further dial in the leveling by adjusting for 48 points across the entire build area. This should only performed after Quad Gantry Level is completed without error messages.
Here is how you can start the Bed Mesh calibbration
In the main interface, press Configuration
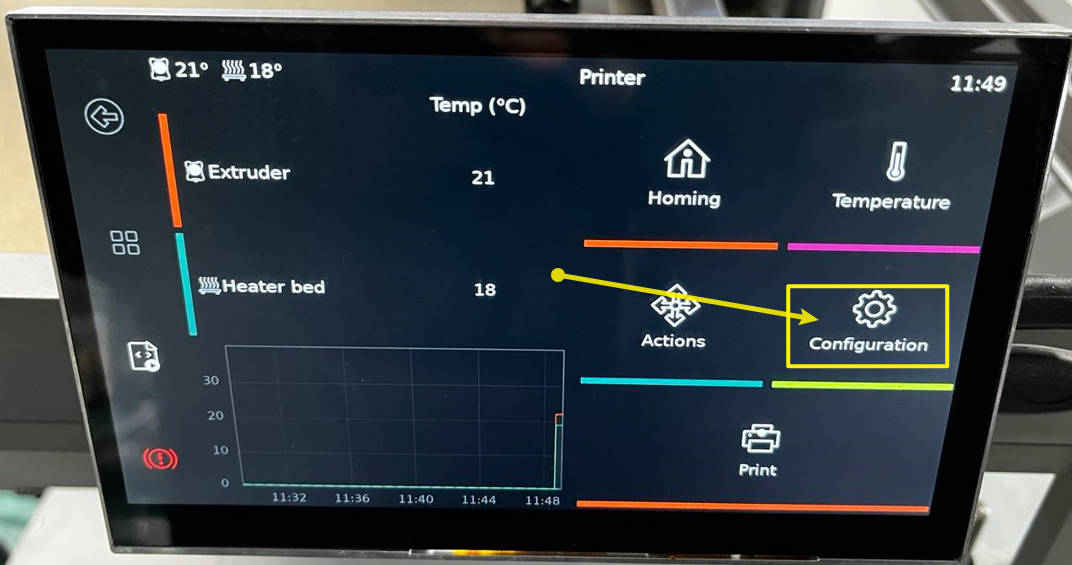
Then press the "Bed Mesh"
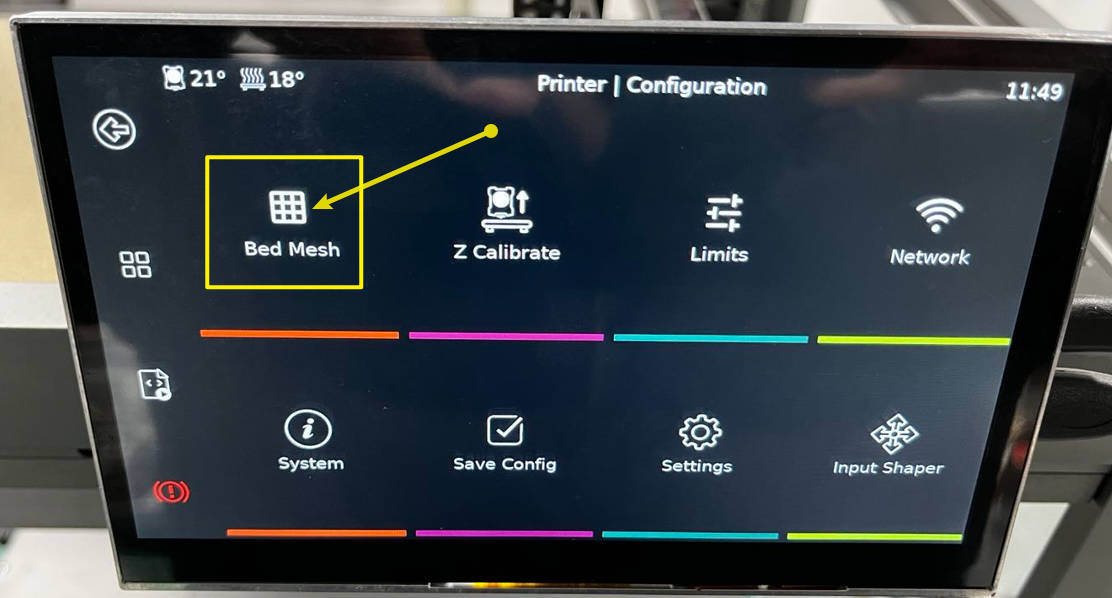
Finally, press "Calibrate" to start the 48-point bed mesh leveling
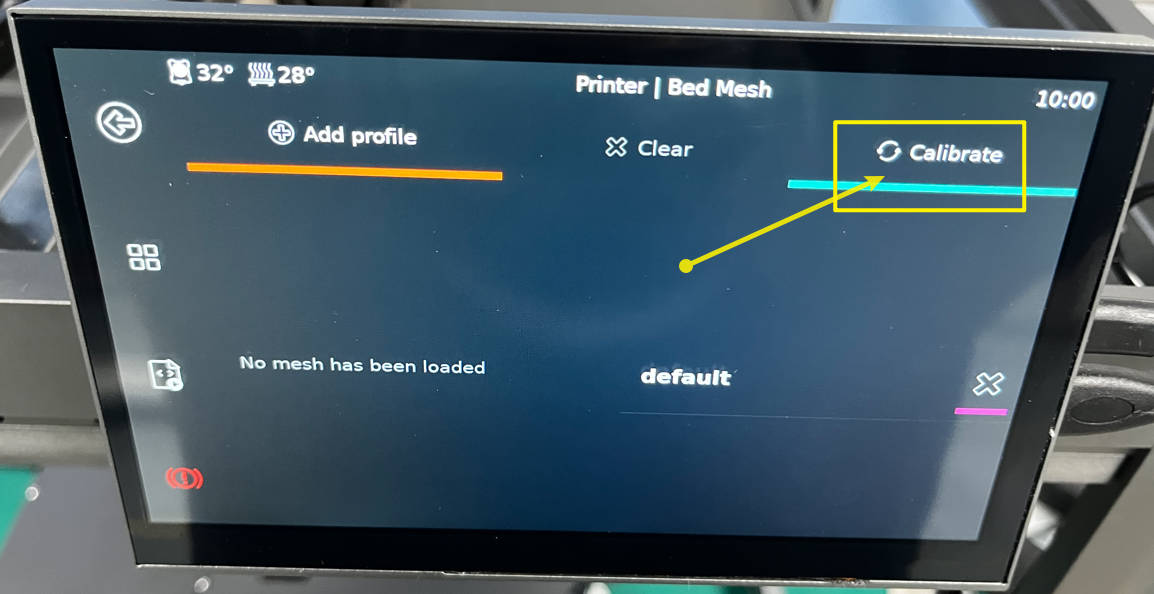
Just like Quad Gantry Level, the Bed Mesh calibration will also heat up the platform to 50C degree before it begins. You will see this message on top of the screen when it is heating up.

After completing the bed mesh, you need to restart Klipper to make the parameters take effect:

You can also check your bed mesh by following steps:

¶ 6. Wifi Settings
Connecting your Magneto X to WiFi enhances its functionality, allowing for remote monitoring and operation. This section will guide you through the process of setting up WiFi using the Klipperscreen interface. Before you begin, note that the Magneto X supports WiFi standards 802.11 N/AC, ensuring a stable and fast connection. The WiFi antenna is pre-installed on your device; please locate it and inspect for any damages or misalignment before proceeding.
¶ 6.1 Accessing WiFi Settings
Navigate to System Settings: On your Klipperscreen, go to the main menu and tap on 'Settings' to find network options.
Select WiFi Network: Look for a 'WiFi' submenu where you can access the WiFi settings.

Subsequently, a character prompt will pop up, indicating that the wifi is being connected. When "Connected" appears, the wifi connection is successful.
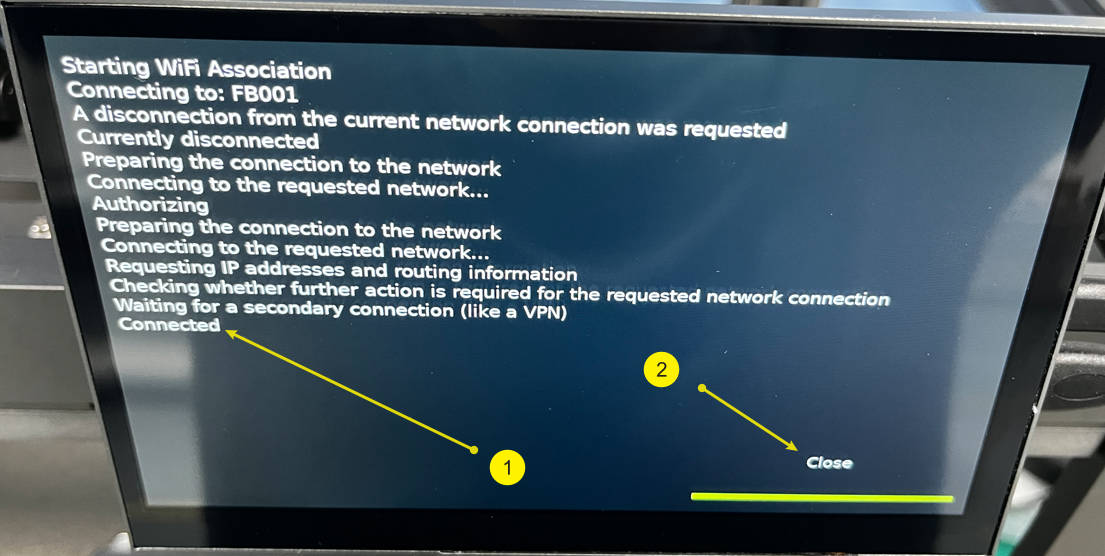
If you have tried many times but still unable to obtain wifi, please refer to these two methods to connect Magneto X to the network:
¶ 6.2 Verifying Connection
Once WiFi is connected, the WiFi network list will show much more info for the connected network, such as IP address and frequency.
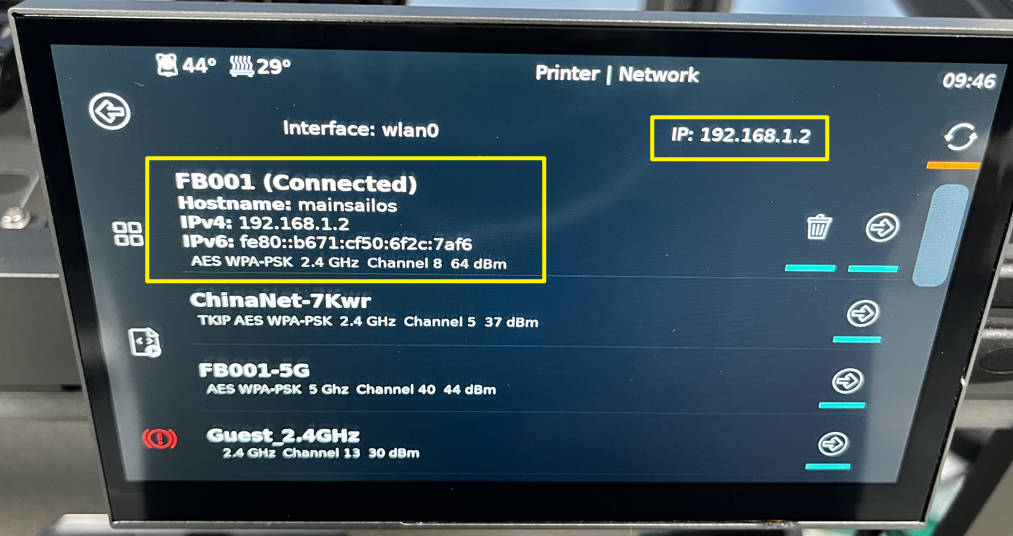
When you connect to wifi for the first time, sometimes the IP will not be displayed on the screen immediately.
If this happens, please restart the printer.
Or, please directly enter: mainsailos.local in the browser to enter the mainsail control page
Write down the ip number as you would need it later.
Troubleshoot If Needed: If the connection fails, double-check your password and network name. Ensure your network is within range and operating on a compatible frequency for the 802.11 N/AC standards.
¶ 6.3 Camera and Browser Checks
- Connect your computer and Magneto X to the same router
- Remove the camera cover:
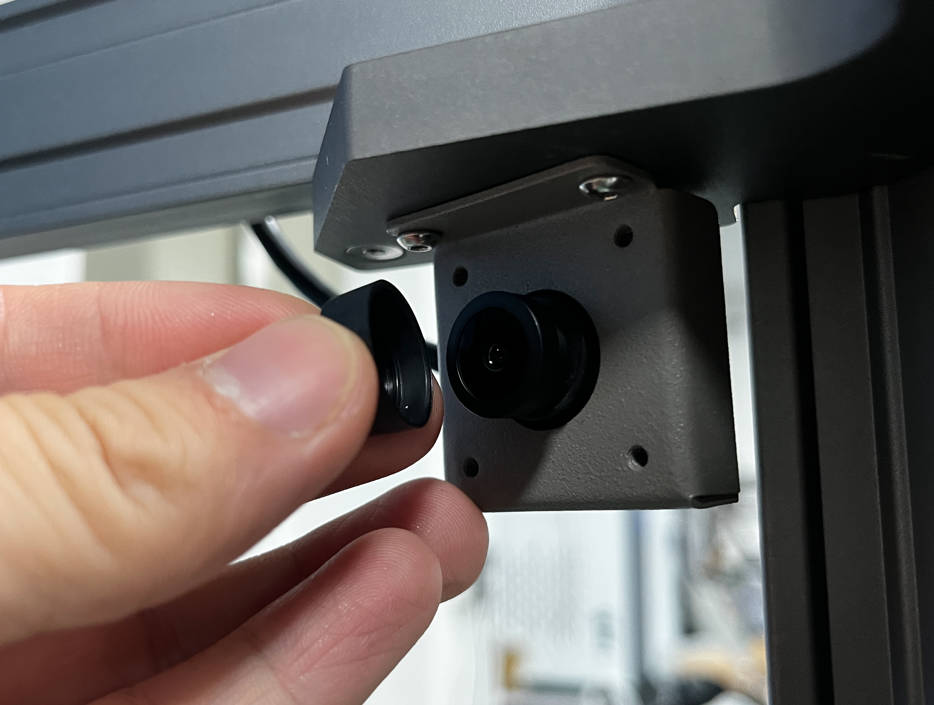
- Open the computer browser
- Enter the IP address of Magneto X obtained in the previous step.
- You can access Magneto X’s web control platform as follows:
Make sure the broswer is not using VPN connection.
Open the default broswer and enter the address from above
And you can see on your browser screen like this:

¶ 6.4 WiFi Best Practices
Secure Network: Ensure your WiFi network is secure to prevent unauthorized access to your printer.
Regular Updates: Keep your printer's firmware and your router's firmware up to date for the best performance and security.
¶ 7. Slicer
Orca Slicer is a powerful, open-source slicing software designed to prepare your 3D models for printing on the Magneto X. Known for its user-friendly interface and robust features, Orca Slicer supports a wide range of printers and materials. It's continually improved by a community of developers and users, ensuring it stays up-to-date with the latest advancements in 3D printing.
¶ 7.1 Introduction to Orca Slicer
Open Source: As an open-source platform, Orca Slicer offers transparency, flexibility, and a wealth of features developed by its community.
User-Friendly: Despite its comprehensive functionality, Orca Slicer maintains an intuitive interface, making it accessible to both beginners and experienced users.
¶ 7.2 Downloading Orca Slicer
Peopoly edition: You can download the Orca Slicer with Magneto Setting here: Link.
We plan to bring Magneto X settings to official release in near future.
¶ 7.3 Installing Orca Slicer
Run Installer: Once downloaded, open the installer and follow the on-screen instructions. Accept the terms, choose your installation directory, and proceed with the installation.
Launch Orca Slicer: After installation, open Orca Slicer. You might need to allow it through your firewall to enable all its features.
¶ 7.4 Adding Magneto X to Orca Slicer
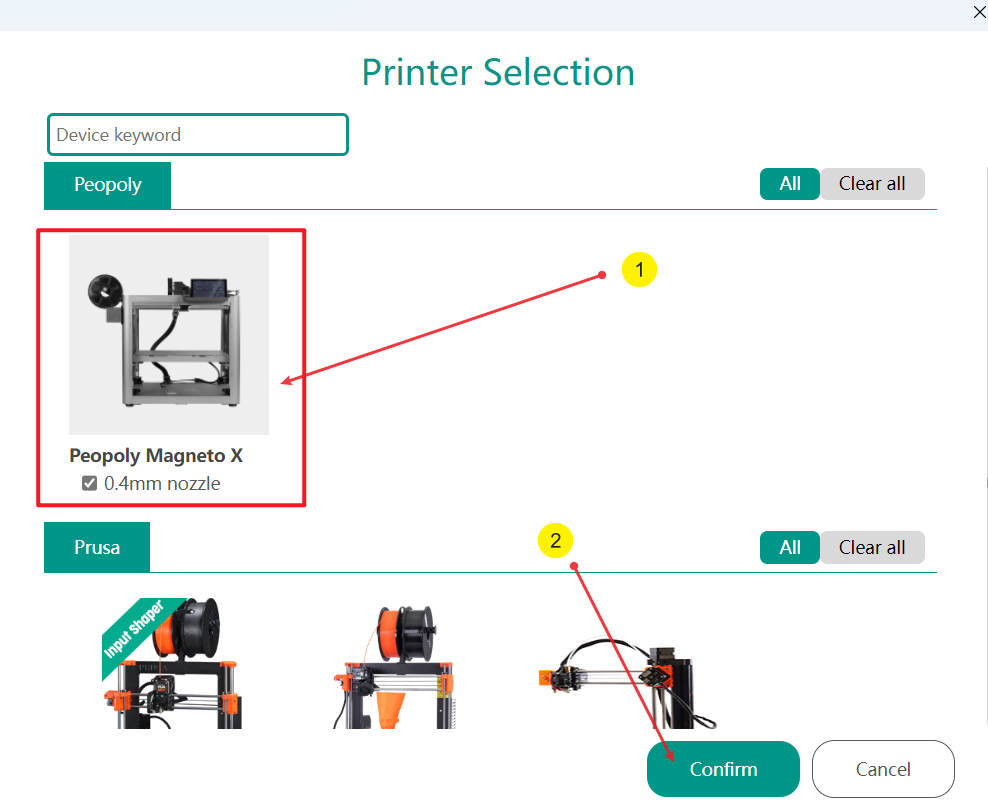
Open Orca Slicer, click Prepare, click the drop-down box below Printer, and click "Add/Remove printers".

After clicking, the following dialog box will pop up. Select the Magneto X machine as shown below.
¶ 7.5 Connecting Orca Slicer to Magneto X:
Network Connection: If your Magneto X is connected to your network via WiFi, Orca Slicer can often connect directly to it. Enter the IP address of your Magneto X in Orca's printer settings.
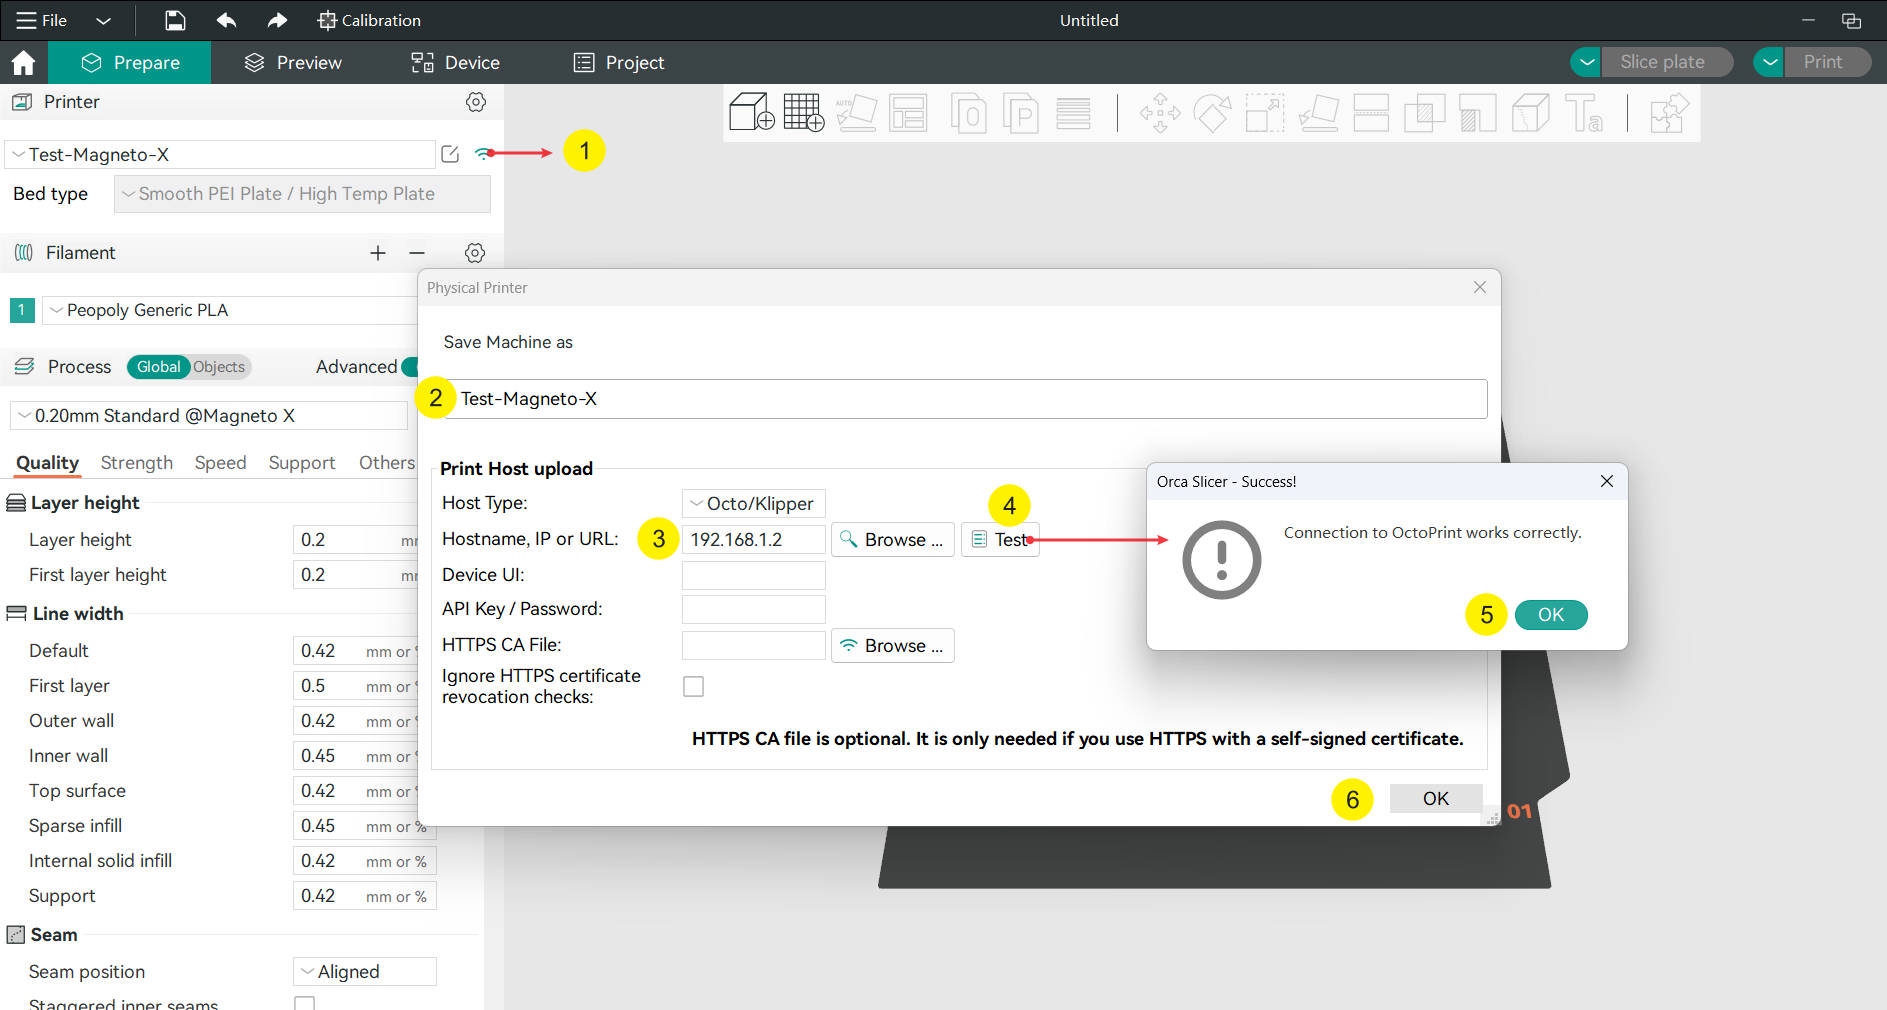
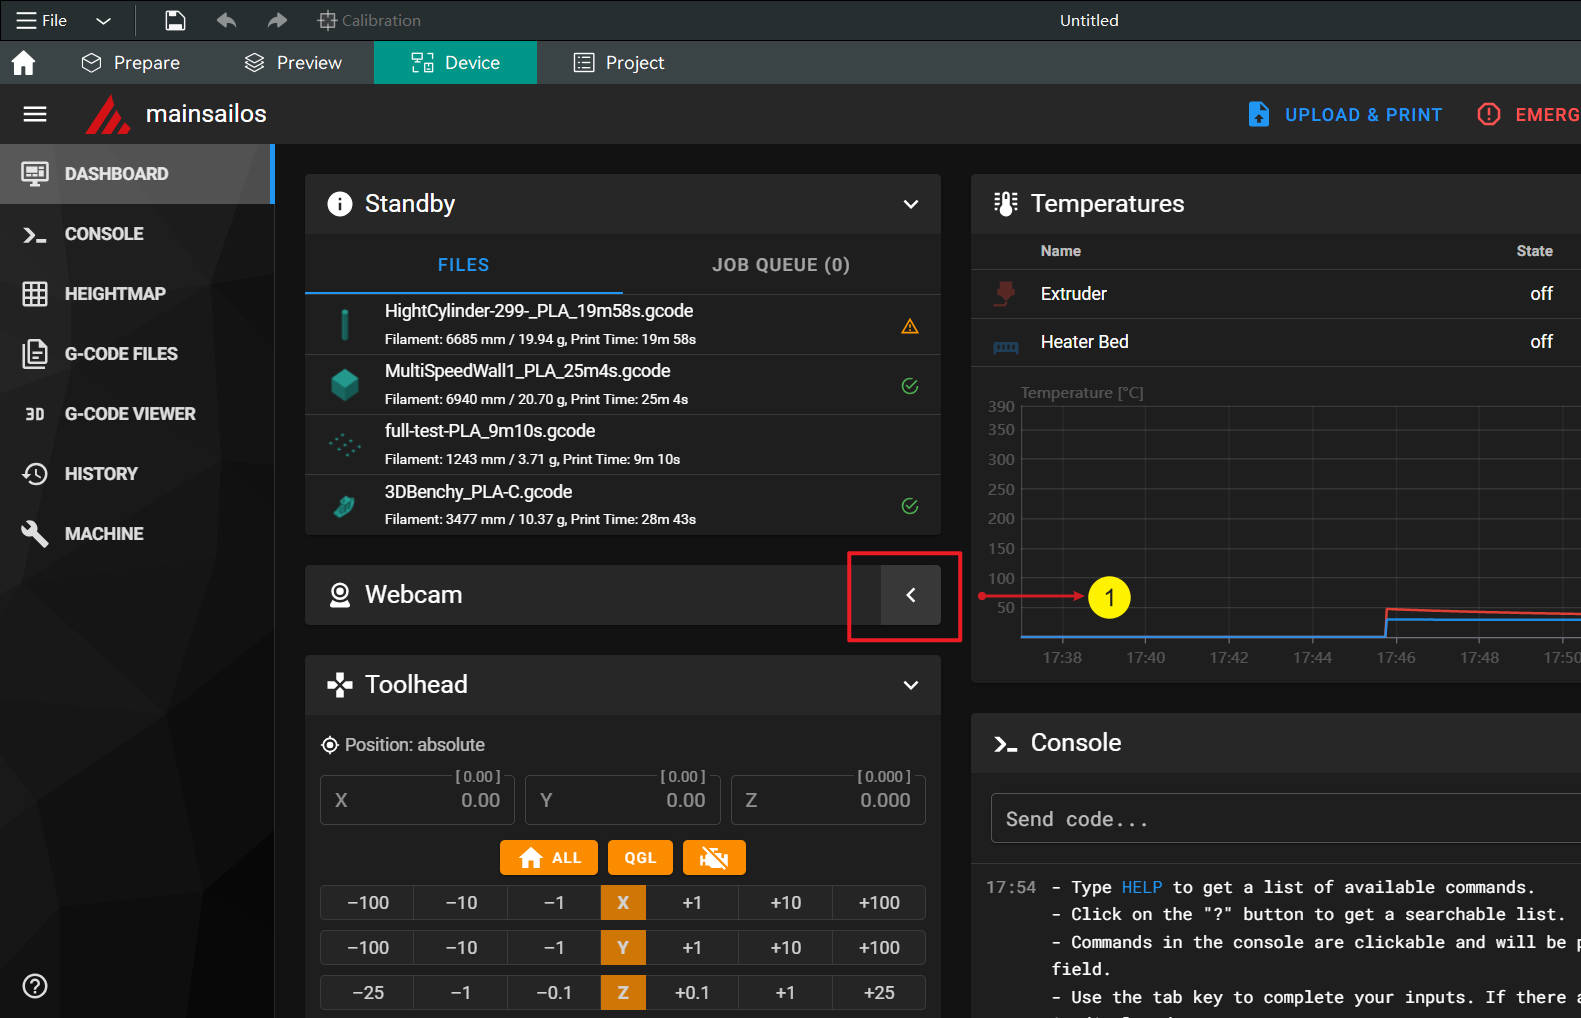
After the connection is successful, click "Device" to see the Magneto X control interface:

¶ 8. Test Printing
Must do following Wiki steps before going forward with printing:
Must Read Before Print
After setting up your Magneto X and becoming familiar with its interface and slicing software, it's time to conduct a test print. This initial print is crucial to verify that your printer is functioning correctly and to understand what a successful print should look like. Here's how to proceed with test printing using the PLA-CF filament that comes with your printer and a pre-sliced file.
¶ 8.1 Loading the Filament
Prepare the material and use needle nose pliers to trim the head of the material:

Heat the Nozzle: Preheat your nozzle to the recommended temperature for PETG-CF. This can usually be done directly from the Klipperscreen interface.
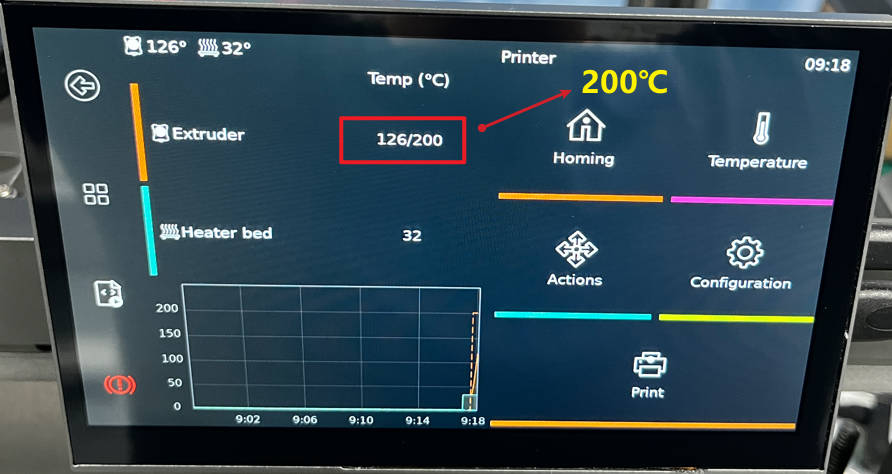
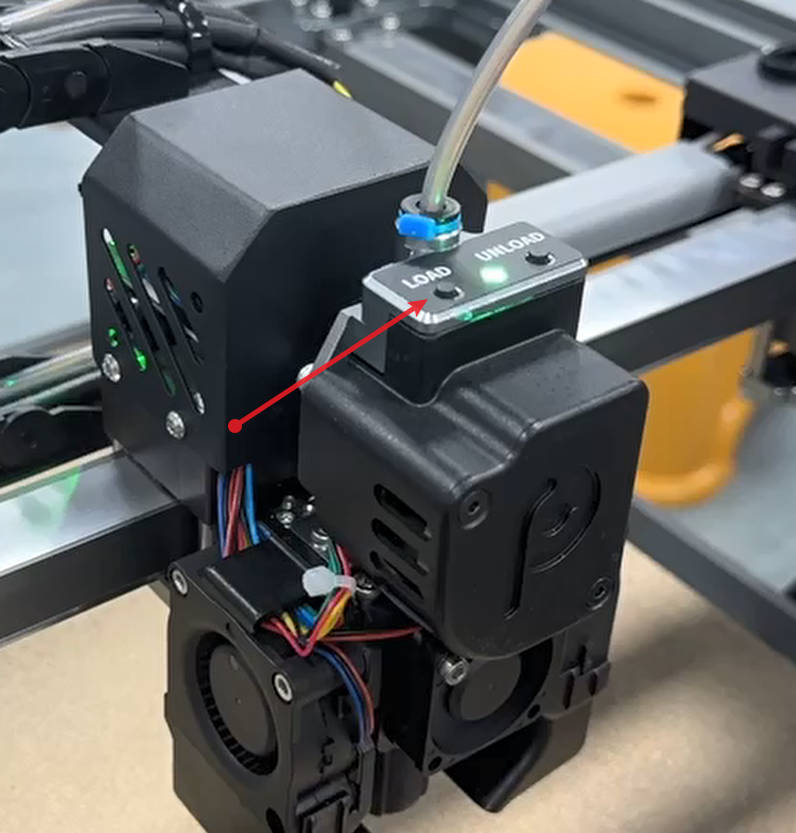
Feed the Filament: Once the nozzle is hot, use the Load button to load the filament. Each time the button is pressed, 20mm of filament will be loaded:
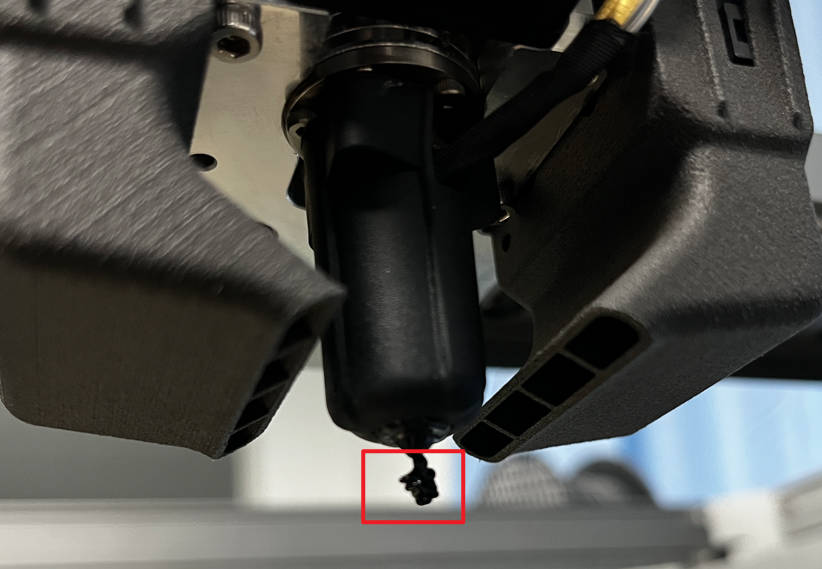
When you see filament starting to be extruded from the nozzle, it means the material is loaded successfully:
If you need to unload the material, please heat the nozzle temperature to 170 degrees, not higher than 180, and then perform the unload operation.
¶ 8.2 Apply a thin coat of glue stick for PEI
Before printing with the Magneto X, please applying a thin coat of glue stick to ensure that the first layer sticks to the PEI platform.

¶ 8.3 Starting the Test Print
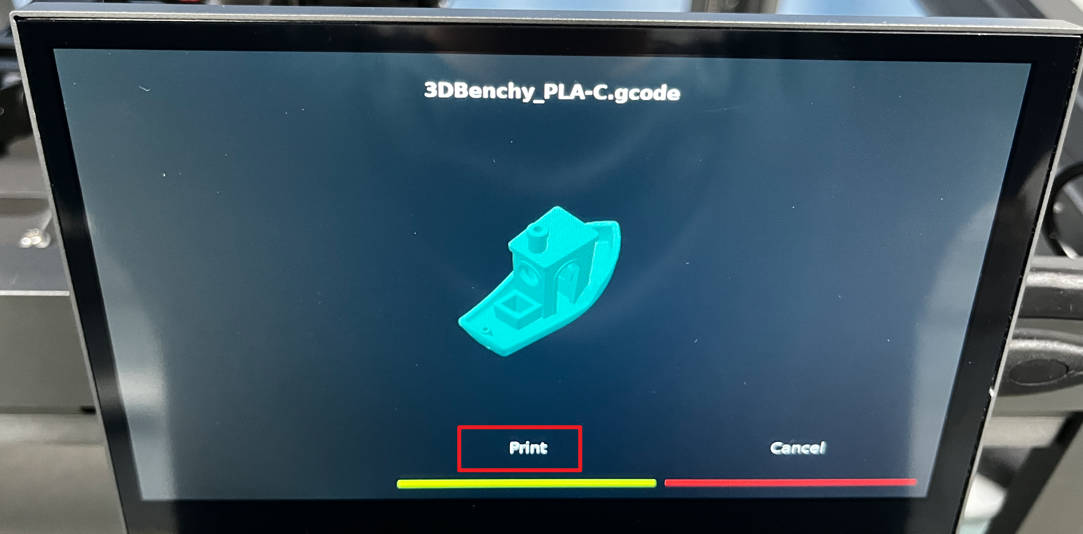
Begin Printing: With the test file selected, start the print. Monitor the first few layers to ensure the filament adheres well to the build plate and that the print is progressing correctly.

¶ 8.4 Monitoring the Print
Observe the Process: As the printer works, watch for any signs of issues like poor adhesion, filament not extruding, or the print head moving erratically.

¶ 8.5 Evaluating a Successful Print
Completion: A successful test print should be completed without interruptions or errors.
Quality: Check the quality of the printed object. Look for smooth layers, proper adhesion to the build plate, and accurate dimensions.
No Defects: Ensure there are no signs of warping, stringing, or blabbing.
¶ 8.6 Identifying Common Print Failures
Warping or Lifting: If corners or sides are lifting off the bed, this could indicate bed leveling issues or incorrect bed temperature.
Stringing or Oozing: If you see thin strings of plastic between parts of your print, this might indicate temperature issues or incorrect retraction settings.
Poor Surface Quality: Bumps, blobs, or holes could suggest problems with extrusion or movement.
¶ 8.7 Next Steps for Print Success
Adjustments: Based on what you observe, you may need to return to calibration, leveling, or slicer settings for adjustments.
Documentation: Keep a log of any issues and the adjustments you've made. This will be helpful for future troubleshooting and fine-tuning.
¶ 8.8 Next Steps for Print Failure
Consult Documentation: Refer to your Magneto X manual and online resources for specific troubleshooting tips.
Seek Community Help: Engage with the Peopoly community or other 3D printing forums for advice and shared experiences.
Methodical Changes: Make one adjustment at a time and test again, so you know what's working and what isn't.
By methodically going through the test printing process, you'll gain valuable insights into your Magneto X's performance and how to achieve the best print results. Remember, patience and careful observation are key to successful 3D printing. Happy printing!